Search This Blog

Monday, May 31, 2021

Power Window Installation Part 2

 The next task was where I deviated from the manufacturer's instructions out of necessity, not convenience. 

If the wire bundle was required to fold between the door and the body hinge area, the wires would soon break, so the kit provides a way for the bundle to slide into and out the body when the door is opened and closed. In their version, the bundle is protected by routing it through a flexible extension spring that prevents the wire from sharp bends as it slides into a nylon tube grommet and into the space behind the body hinge area. Their method would probably work fine with a tall, thin door like those on thirties and forties model cars, but by the mid-fifties, the doors had become shorter and curvier, and some structures less roomy so I was unable to  mount the kit hardware according to their plan.

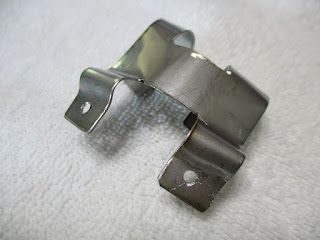
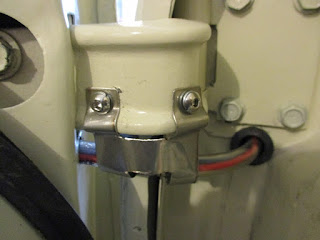
After playing around with different ideas, I decided to see if I could closely duplicate the stock method that Chrysler used in 1956. Once again, I didn't have the stock hardware, nor did I know how it was installed, but Ron Waters sent me a picture on Facebook that showed how and where the bundle was routed using a special bracket to retain, shape and protect the sleeved wires. The design looked simple enough so I tried a couple of configurations and it looked like it would work if I could attach the sleeved bundle to the hinge and align the body and door holes  well enough to allow the bundle to slide. 

I drilled the sheet metal holes successfully but here wasn't enough room for the long nylon grommet inside the body panel so I shortened it about an inch and that seemed to work quite well, but I could see no way to use the spring for protection.  

I then spent a lot of time drilling and tapping threads in the hinges and managed to do so without breaking a tap! The bracket design I made from stainless steel also worked fine with only minor tweaking when installed.


The next task was to route and terminate wires so I could mount the GM style switches in the door panels and lastly, to functional test the switch operation. 


After everything was done, I discovered that I somehow managed to crack the passenger side glass, so now I can undo most of that installation. One step forward and two steps back! Just for kicks, as long as I will have the glass and modified kit frame out, I'll see what can be done to modify and use the stock lower frame for better support. My first guess is that I might be able to get by with the OEM lower frame by cutting off the unneeded appendages and welding two 1/4" studs on the lower channel. I wish I had looked at doing that earlier.    

Everything tested great, so now I've switched my efforts to updating the electrical schematics. 

Tuesday, May 25, 2021

Power Window Installation-Part 1

 The power window kit is installed, wires routed and clamped, circuit powered and switches tested. So far so good!

As mentioned in a previous post, the kit instructions were far more applicable for a '34 Ford coupe than a '56 Plymouth hardtop. That said, I'm certain there are probably more thirty-something hot rods on the road than Forward Look Plymouths, so I'll not complain about the lack of Mopar information. Instead, I will share my experience with my '56 Belvedere 2-door hardtop, and the changes I made to make it a better fit for my situation. Fortunately, Chrysler tends to make most of the brands from the same years similar in design and function, so even if your car is a Chrysler or a DeSoto, you might gain a little info from my project.

The Specialty Power Window kit I installed received high marks from several folks who used it on hot rod projects, and although I found no Mopar projects among the users the function had to be the same, and only the fit required a few changes. This is the only sketch in their installation guide that shows all the components in context. My photo shows all the parts as they come in the kit.


Their instructions are fairly clear in the early steps as they tell how to establish the proper length and cut the tracks to fit your application.

.

Their instructions are less helpful when it comes time to modify the window and attach it to the lift bracket. The Plymouth hardtop lower window frame must be replaced by the kit-supplied channel and since the entire frame is squared and secured by the lower frame, I had to design a substitute method. 

Fortunately I had a piece of 3/8" aluminum channel that fit perfectly inside the rear frame, so I was able to use a simple angle to attach the kit channel to mine with 10-32 screws and nuts. FWIW, I did not use their fabric channel tape since my windows had new tape installed when the glass was replaced.


The method I used is less rigid than the stock Chrysler design, but the way the power window frames move the glass is less stressful than the manual cranks, especially with the light use it will receive. If you intend heavy usage for your windows, I'd suggest the stock parts be modified and welded for more rigidity.


Installing the upper and lower track mounts required cutting sheet metal. The locations don't have to be precise, so I cut the holes where there would be no interference with things to be mounted at a later time. Since I have modified armrest, door handle and window crank locations, your track mounts could be in a different location. Notice the cable from my door handle to the latch and the frame for the armrest and custom inside door handle. There is quite a bit of adjustability built into the kit design, so you have some leeway in where you locate the mounts. After determining the depth of the mounting brackets, I bent them as required and pop-riveted them to the door sheet metal for the top, and to a panel I designed for the bottom. 


I apologize for the formatting, but my layout and the published picture spacing does not agree. I hope I can fix that problem before I post the second part.