Search This Blog

Monday, November 28, 2016

Full of Turkey and Back to Work


Our Thanksgiving company has gone home, so I had a chance to work on a few things yesterday.
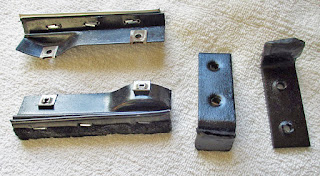
I de-rusted, painted and padded the two styles of brackets that help guide and rattle-proof the quarter window movement when it’s in the open position. The shorter leg of the L-shaped brackets was padded from the factory with some type of rubber material that looked like the same thing that is sold to dip-coat tool handles. I didn’t have any of that product handy, so I substituted gasket making material which should do the job. I know it won’t come off without being cut off, as I discovered trying to clean up some minor spillage that had dried.

Next I installed the track that guides the quarter windows when raised and lowered. This proved difficult as the lower end of the track fits deep into the corner where the sheet metal, floor panel, and inner rocker panels intersect. Due to the extreme rust in that area during repair, it was impossible to get accurate ,measurements to perfectly fit those pieces together, so the track is jammed pretty hard into the corner. I should have caught that during disassembly. I don’t foresee it creating a problem with the window installation, but I’m keeping my fingers crossed.
Once I got the torque converter to seat it didn’t take long to get the transmission mounted, but I ran into another unusual situation. The mounting bracket for the dipstick tube didn’t fit properly, and had to be re-bent quite a lot! I somehow missed taking a photo of the dipstick area during disassembly, so I have no idea what happened.  

I bought the engine and transmission still bolted together and I was the one who tore down everything, so have no one else to blame. Where is a good scapegoat when I need one??
I’ll try to get the engine and transmission installed this week, but I think I’ll pick up a lightweight starter first to make sure there are no fit issues with it.
Thursday, November 24, 2016

Happy Thanksgiving Day


I've always been an individualist, and among my high school friends I was the only one who drove a Plymouth. I was constantly teased about driving a "Mayflower", so my stubbornness to be different has resulted in at least one Plymouth in my driveway continually since 1955. It seems appropriate that I remind everyone that the Plymouth name was borrowed from the Plymouth  Colony, and the symbol from the Mayflower, the ship that carried the pilgrims to the shores of Massachusetts from England in 1621.

Besides the more serious thankfulness I feel on this day, one small thanks is for being able to finally get the torque converter to drop into place!


Sunday, November 20, 2016

Still Having Problems Without Answers


Installing the last piece of stainless trim around the rear window is becoming annoying to say the least. I pulled the equivalent piece from the parts car, and it’s a perfect match for the one giving me fits. That led me to investigate the rubber seal that earlier caused problems for the installer, and I believe it’s the culprit again.
When compared to the old seal on the parts car, there are differences, including profile measurements that might contribute to a poor fit. As I mentioned in an earlier post, the edge of the trim nearest the glass is designed to slip into a groove in the rubber, but there are dimensional differences between new and old. Some deviances in shape can certainly be attributed to time and weather affecting the old one in the parts car, but the depth and width of the groove that concern this trim should be about the same, yet they are substantially different. The slot in the old one has a depth of .26, while the new Steele rubber measures .18. The internal width of the old piece is .10, and the new is not really measurable,  but my guesstimate is about .05. The way it is shaped now, instead of slipping all the way into the groove, the trim edge bottoms out so the rubber puts pressure on the trim and prevents it from slipping into the proper position. I tried taking pictures, but they didn’t show enough detail.

Meanwhile, I’ve put small wedges in the slot and I’ll leave them for a few days to see if they will help form the rubber to make the trim slip in easier.
I feel guilty complaining about the quality of the seal, since Steele is one of the few companies making restoration parts for our cars and kudos to them. This is really the only part from them that has ever given me fit issues. Usually they are equal to, or better fitting than aged NOS parts. Maybe it’s just me, or maybe it’s the uniformity of cars from that era, but it definitely is frustrating.
Not to be outdone in the annoyance department is the torque converter. While waiting for the rubber seal to adjust, I decided to mate the engine and transmission, but so far that hasn’t worked out too well either.
Many years ago, a Mopar friend who owned a transmission shop told me the easy way to mate the TC to an aluminum TorqueFlite was to stand the transmission on the tail shaft and spin the converter a few times until it drops into the proper position. That has always worked well for me in the past so I never felt a need to locate a factory alignment tool, but not this time! Usually a half-dozen spins does the trick, but this time I spun that damn converter until my fingers were raw and it still didn’t drop! I finally decided to call it a day before I resorted to non-productive cursing.
With lots to do before company arrives for Thanksgiving, I doubt I’ll have much time to get back to my latest re-build frustrations until sometime next weekend.

Tuesday, November 15, 2016

Dog Days

One more piece of trim to install on the rear window, and it's proving difficult. Unlike the windshield that's secured by fasteners all around, the lower edge of the rear window upper moulding must fit in a slot in the gasket. Then the ends of both the top and bottom moulding are held in place by the pillar side plate. The problem I'm having is getting one end to stay in the slot, and it appears that the moulding is deformed. I'm beginning to think I got it too hot when polishing and that the thin stainless warped. As I'm getting tired of fighting it, I think I'm going to remove the same piece from my parts car, carefully polish it, and see if it's a better fit.

Meanwhile, it was a beautiful, warm day, so I relegated the car to the back burner and decided to give the big dog a bath. The two Maltese go to the groomer and get bathed in the sink between grooming, but Bonnie, the Shar Pei, gets her bath outdoors. With much colder weather due to arrive Saturday, I thought it best to rid her of the doggie smell while the air was warm. I know, giving one dog a bath doesn't sound like a big deal, but the catch, wrestle and hold experience gives me all the exercise I need for one day! Anyway, she now smells like shampoo and I think has forgiven me for the torturous experience. Unfortunately, now I'll have to smell that Johnson's Baby Shampoo from the foot of the bed for several days...but I guess it's better than doggie odor. I really have to find some mild, unscented shampoo to use on her.           
It was also a good day to take the Valiant out for a spin, as I'll probably put the top up tomorrow so it can sit in the sun while the vinyl top un-wrinkles from being stored in the well since March.

Thursday, November 10, 2016

Windshield Trim

I finished installing the windshield trim, but there were unresolvable issues. They really don't affect my needs, but I can see someone doing a precise restoration tearing their hair out.

Every piece of trim around the windshield is meant to slide into a groove in the rubber seal, but only the lower pieces fit anywhere where they need to be. The top is off by 1/4", and the side mouldings are off by as much as 3/8" in places...far more than can be tweaked to fit. I'm not sure if it's the seal shape, or if the body tolerance is off that much. Now I wish I had taken more close-up pictures of the moulding installations before I began to disassemble the car. Oh, well!


Time to order the rest of the rubber parts I need from Gary Goers, so I worked on a list today. Most items I still need are for side glass installation. When the order is sent off, I next have to replace the Chinese made grease seals on the tie rods, and install a couple of front brake parts. Then I can install the engine and transmission, and it will really look like I'm making progress!

Wednesday, November 9, 2016

Extra Holes Update

Worked a little more on trim installation, but before I did I removed a piece of stainless from the parts car, and found that the questionable A-pillar holes in my car do not exist on the Fury. It appears that there were indeed holes at one time, but that they had been welded shut. The parts car had been painted red over the stock color, and then at some point changed to black, but under the stainless trim the welds were still covered by the original Fury white. That makes me think the holes existed in the original cowling tooling, but were then filled with weld before the car was painted.

However, though it's not shown in the service manual picture, the center hole does exist, and there is some type of fastener in that location on the parts car. I didn't attempt to remove that trim as there is no way to access the nut without removing the heater box housing, and I didn't feel like doing that.

I believe the windshield could be replaced without removing that one piece of trim, and may be the reason it's not addressed in the service manual.

I used only two clips to secure the center trim, and filled the cowl hole with sealer. The other two holes will get the same treatment.

Bolting-on the Bling

Busy day, but I was able to spend a couple of hours mounting stainless trim. Mostly, it went well, but I did run into an odd situation on the windshield trim.


When I stripped the car several years ago, I didn't notice that three holes are inaccessible to install nuts on the mounting clips. I don't recall any unused holes, but then it's been a long time. One location on each side near the A-pillar can't be reached with the dash top installed. To make it even more strange, on the driver's side the hole is mostly covered by one of the stainless pieces, so a screw wouldn't fit properly even if it could be reached from inside. The service manual shows the mounting points near the vent location, but it does not indicate that there are others at the A-pillar locations. Makes me wonder if they were just left open. I didn't find any notes that might shed light on the situation. For what it's worth, the A-pillar side trim doesn't fit well and it determines where the top and bottom pieces are located. That contributes to the partially covered holes, but there is no way they can be adjusted. It appears to be a tolerance issue during the original assembly.

I think the A-pillar holes are located where water might not enter the interior, but I can't clearly visualize the path it would take. That might also be the case for the center clip as it appears that it would drain somewhere inside the fresh air plenum. When the rain stops, I'll crawl inside the donor car to see if I can verify what I suspect.

Here's a picture of the different way I chose to mount the trim.


Instead of the original flat plate with a welded-on stud, I'm using a universal spring clip with a stud. The clip on the left shows how the spring must be re-bent to fit the narrow stainless piece. In place of the black sealant used in the stock method, I'm installing washers made from .125 thick neoprene stock. I punched the center hole smaller than the 10-24 threads so it sort of screws on the stud to seal better. It's far less messy than the stock goop, and it should seal adequately in most locations. Since I have no intention of driving for hours in rainy weather, the only leakage I have to worry about is when the car is washed, so it should be fine.

Thursday, November 3, 2016

And There was Glass!


Thanks to a link provided by Forward Look friend, Marc, I called Extreme Auto Glass Pros in Dallas, and unlike the smaller local auto glass shops, they said that they do install owner provided glass in classic cars. Bob, the technician they sent out, had 37 years of auto glass experience so had done hundreds of older cars. However, to underscore the rarity of finned Mopars in the world, and despite his considerable experience, this was the first ’56 Plymouth he had ever worked on. Fortunately, automotive designs from the same era are similar in concept so after a quick glance at the service manual, he jumped right in.


When I had attempted to install the back glass, I had problems that I attributed to my lack of experience, but Bob immediately ran into the same problem. He asked if the glass was the same one I removed, as it was too small to fit properly in the opening.  I assured him it was, but for the seal to center and secure the glass, he had to shim the lower slot nearly 1/8”. When I removed the old seal, I didn’t notice anything unusual, so perhaps the Steele branded seal isn’t the exact same profile as the original. I’d be interested to hear if others have experienced the same issue.
At this point, the major problem I foresee is the potential for leaks, since it doesn’t fit snuggly. Although the car won’t be driven in rainstorms, that’s not really an issue, but just washing the car could allow water into the trunk.  

The windshield was a ten minute job, as everything fit perfectly.

Inspired by the look of glass in place, I began to lay out the stainless trim. I quickly learned that I should have noted the removal sequence, as it does make a difference which pieces go on first, but I think I have that mostly figured out.
Because of the way the trim is secured by thin slots in the seal, there will be quite a bit of manipulation required to make them fit, so like everything else, that part of the installation will take longer than expected. Also like everything else, I’ll have to make another trip to Fastenal to pick up some #10 rust-resistant nuts and washers. Good news was that the universal moulding fasteners I bought from Rock Auto work great after I re-formed the tension spring so they fit the narrow, ½” moulding.

One interesting tidbit I learned from Bob was that their shop does the glass work for the TV reality series, Gas Monkey Garage, so he’s been involved in some interesting projects.

Bob also took a picture of the photo-shopped version of my car, and if the picture of a picture looks clear enough they will post it in their website album.

I’m slightly disappointed that I wasn’t able to do the glass job all by myself, but I’m glad it’s done so I can get back to serious assembly. The glass installation was $350, so the total cost came to roughly $1200 for all labor, parts and materials.

Wednesday, November 2, 2016

Camp Muir


Thirty-five years ago I completed my most demanding hiking adventure when we reached Camp Muir at the 10,000ft level of Mt. Rainier in Washington State. It’s not a climb, but rather a steep, exhausting hike across a massive ice cream cone-like snow field, and it’s where most climbing parties spend the night before assaulting the summit.
This picture is borrowed from the Internet, as mine are all on slides.


As we rested, we ate lunch, took pictures and marveled at the view…looking down on drifting clouds and the awesome volcanic peaks of the Cascade Range. You could see almost to California.

To the rugged, experienced mountaineer, Camp Muir is nothing more than a freeway rest stop before the real climb to the summit, but to someone raised on the prairies, it’s pretty damned impressive! We had reached our objective after six hours of slipping and sliding in the sun-softening, icy snow, lugging 50lb packs. As we wheezed our way upward in the thinning air, stopping every few steps to recharge our lungs, thoughts of turning back nearly overcame the desire to accomplish our goal, but we persevered.     

Yesterday I experienced thoughts similar to those I had that day on the mountain. Due to slow progress, it’s been difficult to maintain interest in reawakening my Plymouth, and I often considered giving up. Too often I’d find myself sitting in the chair nursing a cup of coffee, and just looking at what had yet to be done, but after seeing the rear glass and windshield installed I know that it’s now mostly downhill. While there are still problems to resolve and hours of tedium to fight, most of the remaining work consists of bolting existing parts and pieces together.  I don’t know if I can retain my enthusiasm once the winter winds begin to blow, but for now, just as I did that day at Camp Muir, I’m going to enjoy the view and pat myself on the back for having reached a mini-summit of sorts.

Pictures of the glass installed to follow.