Search This Blog

Sunday, March 31, 2019

Unchained Melody


While winter makes a brief return, and I'm busy gathering tax info for my preparer, I'll post this rendition of my wife's and my favorite tune. This is definitely one of the best versions I've ever heard, and it's flawlessly performed by a group of military bands from many nations. Music is truly the language of everyone...everywhere.

I'm always amazed at the number of countries this blog has reached, and the number of regular visitors. Not only from English speaking countries like Canada and Great Britain, but others from Germany, Norway, Sweden, Russia, Ukraine, France, Brazil, China, Malaysia and Portugal are frequent readers, as are drop-ins come from another dozen counties.

 It's comforting to realize that beautiful music, much like Virgil Exner's timeless designs, is recognized and appreciated around the world, so thanks to all of you for visiting my little town in Texas to see what one old man is doing what some say is destroying automotive excellence. I prefer to think I'm saving parts and pieces of what would otherwise be scrap metal to pay homage to the past!

No matter what your language, politics, race, or religion, you are all welcome here.

Friday, March 29, 2019

Skipping Around Little Jobs Again

The weather was beautiful for a couple of days, so I opened the big door behind the car and worked on the rear gravel shield. When I bought the Belvedere, much of the tail panel and both gravel shield parts looked like they were made of lace, and the tail panel I bought was only marginally better. The Fury was even worse.


Since there was so much metal missing and the parts were so flimsy, it was next to impossible to determine the exact shape of either part, and with the compound curves it was doubly difficult. The tail panel was the better of the two mating parts, so I used it as the base and left the shield to make-match when the time arrived. Well, the time has arrived, so I cut, shaped, and welded patches for two days. It's not a perfect match by any means, but it's close enough for a driver.

Next little job was finishing and installing the brake release handle and warning light. It works fine, but now I need part numbers so I can order emergency brake cables. Because my entire setup is modified, I can't use the Rock Auto or Raybestos application search feature. I'm using parts from three different cars, so I sent them a description of my problem and requested a link to their engineering catalog. So far there has been no response, so I might have to call tech support next week.


Still working the shock absorber problem, but I think I have identified which part would work the best for my needs, and It wouldn't need an extension. I have to crawl under the car and recheck dimensions with weight off the rear springs.

Thursday, March 21, 2019

Shocking Development

Since I'm still working at the back of the car, I figured it might be time to resolve the shock questions that have been nagging me.

The seventy-something B-body rear end was installed with the shock plates from that part, as I did not attempt to use the '56 mounts. Now, the mounting points have moved inboard and lowered approximately 4-4 1/2". If I attach the shocks the way it sits, they will be at full extension when sitting with a light load. I seem to recall that is the perfect setup if the car is intended for drag racing, but I haven't a clue what the perfect setup is for a daily driver!

I've looked far and wide for shock extenders, but the longest I've found are 2". If I want to have the shocks mid-extension for average driving, I'll have to make custom extenders, or find a longer shock. At this point I'm not sure which way to go, and would like to know how others who did the same rear end swap resolved this situation.

Maybe the HAMB is the place to solicit opinions, but am looking for comments here first.

I have a new visitor from the Forward Look forum who is looking for gauge info about his dad's  '56 Savoy, so I'll post a picture of my old speedometer that might help him.


Tuesday, March 19, 2019

More Trunk Progress


I’m thankful for several nice days in a row to work on the car, as well as catch up on spring yard work. Mornings were spent on the mower, digging weeds, and spreading mulch, but I had nice sunny afternoons to play on the car. I kept the overhead door open to let the sun shine in and concentrated on the trunk area where I could work in shirt sleeves.

I managed to finish installing the Roadkill sound-dampening product, and then designed and welded up a frame to support and tie down the spare tire. I received the Rallye wheel I ordered from Jegs, but the tire I wanted was out of production and had to come from a warehouse in South Texas, so I used one of the tires from the car to determine dimensions for the support frame.

I’m satisfied with the results but won’t bolt the frame in place until after the carpet is installed in the trunk.

If you wonder what the notches are in the tire support cross-bar, it was just a piece I found that happened to be exactly the right length, so I used it since it will be out of sight when the tire is in place. Yes, I know It's overbuilt from heavy angle, but the other size I had was too small.


Now I’m trying to figure out the parking brake cables and rear shock mounting. Neither can use the original locations, so I’m researching cable part numbers, and shock extenders. The longest extensions I could find that look like they would work are 2-1/2 inches, and I need at least 4-1/2 inches to keep the shocks at the stock angle. Looks as if I’ll have to come up with custom-made brackets for these too!

Thursday, March 14, 2019

Decisions...Decisions!

I wish I could make a decision to accomplish things in order, but I always manage to be distracted by something else that makes me change my mind!

While routing and permanently tying wire bundles under the dash, I noticed that I still had to cut, bend and weld the emergency brake pedal, so it aligned properly. I quit bundle-building and started to remove the brake mechanism, but then discovered  that with the dash installed, accessing the mechanism mounting bolts was nearly impossible. Bad planning on my part, so it took over an hour to remove. As I was taking it off, I remembered that I wanted to replace the stock kick panels with sheet metal and then cover them with vinyl. The new panels had to be formed to allow mounting a 6" radio speaker in each one.

I got the driver's side panel cut from 20 ga steel, then formed the panel, and mounted a speaker for a fit check. Everything fit nicely, so I looked for a piece of black vinyl I thought was in a box full of upholstery material in the attic. I guessed wrong, so I painted the panel black and put it aside until the vinyl material arrives.


Then I got back to the brake mechanism and modified the mounting method to make it easier to remove and install. Now that operation works much better, and I finally got around to notching and bending the pedal arm. Tomorrow I'll weld and repaint it...unless something else captures my attention. Maybe then I can get back to finishing the dash wire bundle routing!

I decided that I need a spare tire before I can make a tie-down for it in the trunk, so I ordered a new 15" Mopar Rallye wheel. I searched the Net for one '80 Cordoba wheel to match the ones I already have on the car, but found nothing for sale.

I was shocked to learn that used steel wheels were nearly the same price as new, if shipping was included. Since Jegs pays shipping, a new Rallye was $105 pus tax, and I won't have to strip paint and de-rust! New steel wheels were nearly the same price, so I figured the Rallye would look a lot better than black or white if I have to use a spare.


Tuesday, March 12, 2019

Trunk Equipment Progress

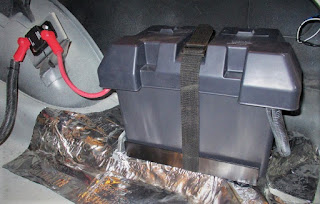
All the trunk-located wire bundles and lights are installed, secured, and tested. The next project was the battery box, and the last two days were spent on that. The main 50 amp circuit breaker is mounted in place, box tie-down bracket fabricated and bolted in place, and the power cable is terminated up to the battery. I'll hold off making the final cable cuts until I can measure the battery terminal locations.

Yes, the tie-down bracket is a little overkill, but I had the angle iron in my stock, so I used what was handy!


I still have to decide exactly where to carry the spare tire, and I don't have it yet so that will be one of my next decisions to make. The logical location, since I no longer have a well to mount it vertically, is the top of the axle hump. It looks like it will fit okay, but I really need the spare and rim to try a fit check so I can design a mounting system. One of the local wrecking yards has quite a few old Mopars, and will probably have a 15" rim on one of the old pickups. I suppose I could fit check with the spare from my '73 D100, but it's quite a bit bigger than the car spare will be, so I'll wait..


Friday, March 1, 2019

Console Bus and Trunk Wire Bundle

The console power bus is complete unless I run into something unforeseen that would require adding a circuit. It came out okay, but as with most wiring, I'd like to have the time to make it neater. Fortunately, it will be hidden from view behind the console storage box.


The flexible metal tabs that support the trunk wire bundles were all rusted off, so I was about to buy some cable tie mounts so tie straps could be used to secure the bundle. But, being frugal whenever possible, I tried creating something functionally similar to the OEM design. The stock tabs were made of very soft and flexible metal and spot welded on, so I couldn't duplicate that. Since I had a bucket full of sheet metal scraps, I tried using the remnants from the metal cutting process. I formed short pieces to lay against the sheet metal and bonded them in place with 5-minute epoxy.

This is one of the cutting scraps and a part I formed from it. They bend easily, and though they might become work-hardened faster than the stock parts, they should outlast me and the rest of the car.


The next shows them epoxied in place and securing the wire bundle in place along the trunk opening. Again, it's not pretty, but seems to doing the job quiet well, and it's not glaringly visible.