Some info for David.
I cleaned up and measured the pull strength of three different hood springs. Not the most precise measuring tools were used, but I pulled them the 1-1/4" distance that is their full travel when opening and closing the hood, and noted the maximum reading. Measurements were taken with a digital luggage scale.
The best spring, no rust and heavily painted gray, measured in excess of 110 lb, as that's the limit of the scale. It had nearly reached the full stretch before it went over scale so I'm sure it's somewhere close to 110. The next best, also no rust and heavily painted, was 108 lb. The last had some surface rust that was beginning to etch the surface of the entire spring. It measured 87 lb.
I have two more springs still attached to the hinges that I will measure when I get around to removing and cleaning them, but they too have some rust, so I'm guessing they will also be weaker. They are still on the parts car and the hood sags somewhat.
Monday, December 22, 2014
Sunday, December 21, 2014
Christmas Break
Still haven't recovered entirely from my cold, so not much energy, and too many holiday chores with priority for much to be happening on the '56. Spent a few hours stripping, cleaning and sanding the Cordoba alloy wheels. After cleaning, sprayed wheels with one coat of Por clear sealer. Instructions with can said to not thin, but mixture was too thick to spray evenly. Internet post said to use Xylene to thin if necessary, and yes, it is necessary. Had to re-sand uneven areas and now waiting for Xylene to arrive. None to be found in Denton County, so ordered online. Should be here on the 29th.
Don't see much happening until the new year.
Don't see much happening until the new year.
Sunday, December 7, 2014
The U.S. Air Force Band at the Smithsonian
With the crappy cold ruining my restoration efforts, I'll just relax with some fond memories of the twenty-three years I wore Air Force blue.
Saturday, December 6, 2014
12/6/14
Picked up a '66 engine and transmission from East Texas and started disassembly. Hope to get the block, heads and crankshaft into the machine shop before Christmas. The plan is to buy new rods, but pistons might be a problem. Also not sure what to do about a camshaft.
Before bringing it in for a rebuild I'll play with the transmission to see if I can get the pushbuttons to shift without requiring excessive pressure.

Also started cleaning up the Cordoba wheels so I can clear coat them and get tires mounted. Ordered P215-70-R15 Cooper narrow whitewalls from Discount tire and they already arrived. They were the only whitewalls available in the size I needed, and I don't want to go with wide whites just to get the brand I prefer. I spent too many years trying to keep them looking nice, and I'm done with
A winter cold is limiting my enthusiasm to do anything.
Before bringing it in for a rebuild I'll play with the transmission to see if I can get the pushbuttons to shift without requiring excessive pressure.
Also started cleaning up the Cordoba wheels so I can clear coat them and get tires mounted. Ordered P215-70-R15 Cooper narrow whitewalls from Discount tire and they already arrived. They were the only whitewalls available in the size I needed, and I don't want to go with wide whites just to get the brand I prefer. I spent too many years trying to keep them looking nice, and I'm done with
A winter cold is limiting my enthusiasm to do anything.
Tuesday, November 25, 2014
11-25-14
Finished repairing driver's side door and temporarily installed it for a fit check, but without fenders I can't do much adjusting.

Wish I could get a decent day to shoot the body with epoxy primer outside, but wind and cold won't permit. The self-etching primer coat will not do much to resist moisture when the high humidity rainy days arrive in a few weeks.
Arranged to pick up the '66 Poly and transmission next week, but forecast is for rain and I don't want to drive that far and haul parts back in foul weather.
Sent out a request for quotes for custom made hood springs, but so far there is little interest from other owners. Set up fee will be around $400 and that is too much for a couple of buyers to absorb. I might have to get by with old springs.
Tuesday, November 18, 2014
11-18-14
Just an update for those still following my progress.
Global warming has slowed down progress considerably. The plan was to prime the body with epoxy primer before joining it to the frame, but the weather isn't cooperating. Temperatures have been 10 to 30 degrees below normal for about two weeks, and only slight moderating is expected in the next ten days. Average high for this part of the state on this date is 67F, but yesterday's high was only 38F with strong NW winds. The previous night's snow didn't even melt in the shade. Today is a bit warmer, but very windy. The leaves didn't even get a chance to change colors, so many of the trees are covered with frozen green leaves that have now turned black.
Since I can't paint and proceed with the body-joining plan, I've started repairing doors. The complexity of forming small metal patches makes it a very time consuming job and the cold floors in the workshop have dampened my enthusiasm for spending a lot of time out there. That means there will be no photos to post anytime soon.
To top it off, my welding helmet is no longer darkening automatically. I pulled the electronics module out and placed the solar panels in a bright area to see if the batteries will recharge. If not, it looks like I'll have to buy a replacement before I can weld any more patches in place.
Wednesday, November 12, 2014


Saturday, November 1, 2014
11-1-14
License plate bracket received and temporarily installed.
 My old Washington truck license covers filler cap except from a direct side view.

Thursday, October 30, 2014
10-30-14
Fabricated and painted brackets for fuel tank.

Installed rebuilt 11" x 2-1/2" brakes and new finned drums. Decided to wait with wheel bearings and seals until car is running so I can also check condition of gears and pinion seal and bearings. Axle bearings are quite worn, but seals weren't leaking.


Next I'll permanently install fuel tank and finish a few things on the body so I can apply a coat of epoxy primer and then join the body and frame before the weather gets bad.
Installed rebuilt 11" x 2-1/2" brakes and new finned drums. Decided to wait with wheel bearings and seals until car is running so I can also check condition of gears and pinion seal and bearings. Axle bearings are quite worn, but seals weren't leaking.
Next I'll permanently install fuel tank and finish a few things on the body so I can apply a coat of epoxy primer and then join the body and frame before the weather gets bad.
Tuesday, October 28, 2014
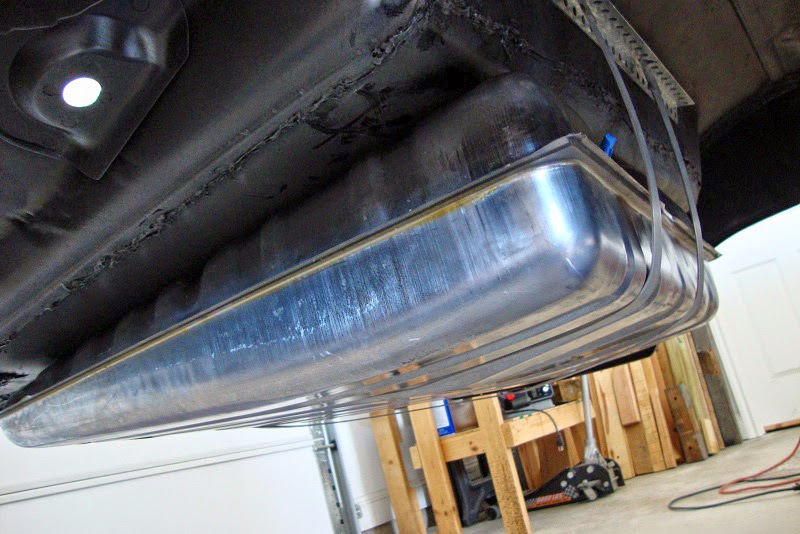
Fuel Tank Install-Rear Brake Buildup
Last parts for fuel tank and rear brakes received. 1964 B-body tank is perfect for my custom installation. Took two days to temporarily install for fit and measure for permanent mounting brackets. All parts are very high quality. Hinged license plate bracket ordered 10-27.


Rear brakes are assembled onto backplates and ready to install. Double flaring kit and copper/nickel brake line are very easy to work with, and well worth the few dollars extra over steel line. Had to order different center-flex line as B-body banjo style was too short. Used '73 Dodge truck part that was five inches longer, and barely long enough.


Rear brakes are assembled onto backplates and ready to install. Double flaring kit and copper/nickel brake line are very easy to work with, and well worth the few dollars extra over steel line. Had to order different center-flex line as B-body banjo style was too short. Used '73 Dodge truck part that was five inches longer, and barely long enough.
Sunday, October 19, 2014
10-19-14
Ordered a roll of copper nickel brake line and fittings, double flare tool, fuel tank neck, insulator pad, grommet, straps and sending unit.
Finished cleaning the remaining salvaged brake parts.
Finished cleaning the remaining salvaged brake parts.
Friday, October 17, 2014
10-17-14
1964 B-body gas tank arrived and looks to be perfect fit with relocated filler neck! Made in Canada and looks very high quality. Not sure about which straps will work best, but will order '64 straps and make them fit.
Fabricated cover for vent opening and welded in place. Rear brake parts starting to arrive. Still need shoes, axle bearings and axle gasket.


Fabricated cover for vent opening and welded in place. Rear brake parts starting to arrive. Still need shoes, axle bearings and axle gasket.
Tuesday, October 14, 2014
Brakes Arrived and New Parts Shipped
Only two days to get 11" brake back plates from Spokane. They were cruddier than they looked in pictures, so disassembled and started cleaning and de-rusting. Ordered gas tank and brake drums and cylinders 10-13. Notified all were shipped 10-14.
Sunday, October 12, 2014
Pitted Area Repair
Moved outside to glaze and sand localized pitted areas and
tail panel.
Control arm bumpers arrived from Gary Goers ten days after I
sent in the order. Parts look very nice.
Bought 11” X 2-1/2”rear brake backing plates and guts from
Spokane individual on e-bay. Need to order drums, cylinders and brake lines.
Will also replace wheel bearings, seals and gaskets as long as the axles are
being pulled.


Friday, October 10, 2014
10-9-14
Repaired small pitted areas around windshield with metal, filled, sanded and primed.
Removed and cleaned rear brake backing plates and drums from Fury. Unable to identify original donor model as drums don't match any dimensions found in Rock Auto catalog. Looking for Internet help.
Removed and cleaned rear brake backing plates and drums from Fury. Unable to identify original donor model as drums don't match any dimensions found in Rock Auto catalog. Looking for Internet help.
Wednesday, October 8, 2014
Changes
In the past I've tried to make regular entries, provide pictures and text to explain my progress, and sometimes to simply share my thoughts. Since that didn't work very well, I've decided to turn these pages into nothing more than a journal for my personal use. However, it will remain public and if anyone chooses to drop in, they are welcome, but shouldn't expect anything more than a few pictures and notes to myself.
Sunday, October 5, 2014
Facing Reality
I began this ’56 Plymouth rebuild blog four years ago with
the idea of sharing my frustrations, successes, and learning experiences with
others contemplating, or already immersed in a restoration project. Because my
car is an oddball make and model there wasn’t a lot in the way of body parts that
could be ordered from a catalog, and the people who knew and had experience
restoring these cars were few and far between, so the task was intimidating.
Boy, was that an underestimation!
What I was unwilling to accept was that we truly live in a
belly button world and for every person interested in a ’56 Plymouth there are
a hundred thousand sheep enamored with ’57 Chevys. I had hoped to attract
readers who wanted to see what else is out there from the glorious fifties besides
Tri-five bowties, but apparently there is even a smaller handful of people who
fit that description than I thought.
In those four years, despite blog links in my signature on a
dozen car and motorsports forums, I’ve managed to attract a grand total of one
follower, and while I’m grateful for his interest and loyalty, it’s rather
foolish to continue writing for a nearly empty house. I know that some of you
drop in periodically, and others stumble in with a web search, but for the most
part, there is no interest in either the car or my narrative. Even my letters
seeking information and guidance from “recognized Mopar authorities” go
unanswered, so I’m pretty much on my own when it comes to research. I can’t
even discuss the project on the Forward Look forum, as there is so much
ingrained opposition to modifying any part of the original factory design and I’ve
discovered that it’s counterproductive to ruffle the feathers of purists. Although
it sometimes takes a while, I eventually get the hint.
I think the time has arrived to back out gracefully, with
heartfelt thanks to the few who took the time to read my posts, offer
suggestions and encouragement, but more importantly just for being an Internet friend
with similar interests.
At my age, there is a real possibility that my project may never
see the street. However I intend to keep chipping away, and maybe someday I’ll
be able to post photos of the old Plymouth under power. If so, it will probably
be similar to what a friend used to tell me when he had accomplished something
he was proud of, but had been dismissed or ignored by others…”It’s like wetting your pants
in a dark suit, you get a warm feeling, but nobody notices”.
Sunday, September 28, 2014
It Rolls!
After two and a half years, there are four wheels on the
ground again. The front suspension is installed, along with the wheel portion
of the disk brake conversion kit. I couldn’t mount the calipers yet as there
isn’t enough room inside the 14” roll-around wheels. The 15” Cordoba wheels
will cure that, and since it will be a while before brake lines will be
installed, there is no reason to mount calipers and expose them to the weather.

I had a couple of issues while installing the AAJ brake kit,
but nothing that wasn’t easily resolved, and it wasn’t a fault of the kit. The
first was very minor as there was an interference fit between the adapter and
the spindle casting on the right side that was cured by grinding a small notch
in the adapter.
The left side had a different problem as the spacing of the
holes to mount the adapters and the steering arm was slightly off from the spindle
holes. It was only .02”, but because of the close tolerance, I had to slightly
oval the bracket holes to get the bolts in. Although they appear to be
original, the spindle castings have several minor but measureable differences,
including that hole spacing. Different Chrysler suppliers is my guess.

Another minor issue that might be applicable to others
installing this kit was the fit of the main castle nut. After tightening, and
backing off enough to free the wheel to spin easily, the cotter pin couldn’t be
installed. Deepening the notch in the nut by a few thousandths fixed that. So
far, the brake kit parts seem to be high quality, precision made and even the
smallest parts have been supplied.
I wish I could say something similar about the Kanter supplied,
Chinese sourced, front end kit, but it’s a real disappointment. Besides the
problems identified in a post several weeks ago, even more surfaced today. The
most irritating problem was the threaded bushing dimensional tolerance. The outer
threads were not cut accurately and the bushings would bind while being
installed in the spindles and control arms, so once again I had to use some of
the old bushings in order to make everything work.
The grease seals are cheaply designed; with some being
nothing more than glorified garden hose gaskets. They fit loosely and don’t cover
the open areas, leaving gaps where dirt can penetrate down into the threads. They
will probably be adequate for a fair weather car, but if the kit was to be
installed on a daily driver, parts wouldn’t last very long once exposed to a
steady diet of dust, water and mud.
The holes for the grease zerks were also not tapped properly
and several had to be re-threaded. If it hadn’t been for the hardened grease in
the old front end parts, I believe I would have been better off buying only a
king pin kit and tie rod ends, but boiling out and using all the old parts along
with new zerks and seals. It would have been much cheaper and the quality probably as good. I wonder if American consumers will ever get tired enough of
crappy Chinese goods to stage a buyer’s revolt? I know that after I install the
last pieces of this Kanter kit, they will be on the receiving end of a very
nasty letter.
One final comment on the front end and brake install. Yes, with
moderate mechanical skills, a novice can do all the tasks required to rebuild
and/or install the parts, but would be hard pressed to do it all without a shop
full of professional grade tools. If you don’t have access to the right tools and
you had to buy everything required to do the job, you would be much smarter financially
to forego ordering tools of unknown quality and save the money to have your
local machinist to do the hard parts. That said, the spindle holes that I had
the machine shop tap were done with a tap that did a rather poor job of cutting
and the bolts would start to bind before going more than three or four threads
deep. Fortunately, the tap I had previously ordered finished the job just fine.
Wednesday, September 24, 2014
One Step Forward...One Step Back
I thought I had everything needed to assemble the front suspension,
but realized the control arm snubbers were not included in the rebuild kit from
Kanter. They were part of a kit from another source, and I missed the fact that the one I bought does not have them. I fired off an order to Gary Goers this
morning, so Hope he can get to it quickly. I can still assemble most of the suspension and brakes, so
it’s not a big deal, but I have to pay better attention when ordering parts.
The trophy shop finally completed the engraved legend plates for the shifter, so one more step is complete. I hooked it up to 12VDC and it looks okay, though I’d still like the numbers to be better. Now I'll box it up for storage until I find a transmission.

Got the Belvedere trim holes filled in the quarter panels
and applied a few coats of Bondo. I really don’t care to do body work, but unless I want sanding dust in unreachable areas, most
of it needs to be done before joining the body and frame. The pictures are
blurry, but my cheap camera does that occasionally and I’m sure everyone has
seen enough Bondo applied to make that unimportant.

Friday, September 19, 2014
Friday 9-19
I decided to farm out some of the work I dislike, mainly because I don't have all the tools needed to make the job easier. One of those tasks was modifying the spindles for the disk brake conversion. I had ordered a 37/64th drill bit to bring the holes that needed threading up to the size needed for the tap. The damn thing wasn't cheap in price, but even though it wasn't stamped Made in China, it sure was cheap in quality! The holes only had to be opened a few hundredths, but despite lots of oil and slow feeding, the bit was dull before I had gone a quarter inch into the cast spindle.
Rather than fight the issue, I decided to take the parts to the local machine shop and spend my time on things that interest me more. Lord knows there no shortage of work to do! The machine shop had no problem tapping the holes, but they wouldn't do the necessary grinding with the king pins installed, as they couldn't mount them in the mill. There was no way I was going to remove anything after the difficulty getting them installed! Oh well, I guess I'll have to do the grinding myself.
I finally figured out how to apply the numbers and letters on the pushbuttons without hand engraving. I bought a set of cheap steel stamps, heated them with a propane torch, and "branded" the end of the Lexan button. It was difficult getting the imprint to align perfectly, but at least they are marked and don't look too bad. Without a doubt, better quality steel stamps would have made a better looking imprint. Now the legend plates must be engraved for the Park lever and a "TorqueFlite" replacement for the "New PowerFlite" plate. The remaining appearance tasks for the shift pod will be bonding a piece of felt to the back of the trim plate to prevent rattles and light leaks, and finally, a paint job. Then I can put it away until I get a shift cable and mock up the remaining shift hardware.
It appears that an embossed aluminum side spear replacement is not going to be found, and even if all the NOS pieces could be found, I wouldn't use them on a faux-Fury. The only alternative I can think of is vinyl so I visited a sign shop to see what they can do. They were very interested in the project and suggested using a gold, brush-finish metallic appearing material, and then try printing thin, non-gloss lines to visually simulate the OEM texture. They had some research to do, so I left the job with them.
The weather forecast looks good for the next week, and my wife is healing and getting around better, so maybe I can get more body work accomplished for the next entry.
Sunday, September 14, 2014
Remembering 1956
Too many interruptions to do any work on the car today, but I sat in the garage with a cup of coffee and took a few minutes to reminisce about my first affair with a '56 Plymouth.
I was listening to a radio talk show last week, and they were discussing why everyone believes that music from their generation is always the best. They said it has nothing to do with the technical or artistic quality of the music, but rather which songs you associate with the most enjoyable times of your life, and the nostalgia that music generates. Not sure if that's true, because there wasn't an awful lot about my high school years that I recall as enjoyable.
Anyway, my memories of driving dad's '56 Belvedere include my first girlfriend...cute, brown-eyed, straight-laced, not quite filled out, with a great sense of humor and an addiction to potato chips. I'd borrow dad's car for those special dates, like proms and anything else I could convince him demanded that I drive something cleaner and classier than my well-used '48 Plymouth to chauffer a young lady wearing a dress with yards of crinoline petty coats and a white sweater. This song was very popular at the time, so it also belongs in those memories, and for what it's worth, I'll put the quality of nearly all the music from my era up against anything ever recorded. The cars and the music were golden and history will remember both long after hip-hop and the generic look-alike cars of today are long gone.
Thursday, September 11, 2014
Hot Weather and Other Excuses
Afternoons have just been too hot to work on the body in the
non-cooled work bay, and mornings have been taken up by other things, some of which can't be put off or ignored.
My wife entered
the hospital for back surgery on Monday and came home Tuesday, so I have to
give her recovery priority over my pet projects. Modern surgery techniques are
amazing, but she’s limited on what she can do for at least two weeks and I have to keep an eye on her so she doesn't undo what the surgeon did.
I did manage to begin repairing areas that need body filler
and the right rear quarter panel is the neediest. There was a small dent that
was mostly taken care of when the patch panel was replaced, but I’m not skilled enough...even if I had all the tools...to totally eliminate the damage with metal forming tools, so I hauled out the can of Bondo. Since the right rear is where I eliminated the fuel filler door and
welded in a plate, it took a little more work to level the area. However, I hate relying totally on Bondo, so decided to give Eastwood’s
lead-free solder product a try.

There are a few places with fairly deep pitting
in the sheet metal, along with some pinholes, but the surrounding metal is
still solid and unbent and the affected areas are too small to require a welded
patch. They are mostly located in moisture trapping areas under chrome or
stainless trim and they are localized, which makes them the perfect place to attempt repairs with real metal.

Just as required with the Muggy Weld, cleanliness is important
to prevent voids. Starting on a small area, I first wire brushed the pitted area,
then used a Dremel with a small bur to dig out any remaining contamination.
Unlike the mild honey colored flux in the Muggy Weld kit, this kit has a jar of
nearly black “tinning butter” to clean the area. It does a better job of
preparing the surface, but even it can’t clean well unless visible contamination
is physically removed first. I didn't get a "before" picture of the damage here, but it was similar to the other pictures, just not as much of it. This was my first attempt at tinning.

It took some practice, but I managed to get the melted metal
fairly smooth with a wooden paddle before it cooled, so there wasn’t a need for
a lot of filing and sanding. A small rasp, a file, and a Dremel drum sander
were all that was needed to work the soft metal down. There are still a few tiny voids, but I'll fill them with Bondo and try to do better on the next one. I'm sure my tinning skills will be vastly
improved by the time I get to the last area needing repair, and then I’ll never
need to do it again.

Friday, September 5, 2014
Got Trim!
Rigidized Metal Corp came through and delivered on schedule the
patterned aluminum material I ordered. The stamped pattern is not an exact
match for the OEM parts, but it’s close enough as is, and if I make a tool to
add an additional line imprint, it would be next to impossible to spot the
difference. I’m quite satisfied with what they sent.
I quickly made a rough trim plate for the shifter pod so I could
do a quick check of the button alignment and operation before crimping the brass sleeves in
place. They all operate smoothly, but I’m not quite satisfied with the
alignment of a couple of them. After the modified shifter assembly is finished and the cable is operating properly, I’ll make a couple of new buttons and do
some minor realignment in the trim plate.


In the last two photos, you can see the latest iteration of
the Park lever module in both the park and released positions. The improvements
are a rubber pad for the spring to ride on in the released position, and a spring
loaded roller to apply a small amount of pressure to the side of the shaft in
the engaged position. Both were added to prevent rattles and contribute to smoother
movement. The pawl to operate the cable pin has yet to be welded to the shaft,
as I want to first verify the correct amount of movement required after I get
the bell crank parts attached.


Not much progress to report on the body work. I did roll it
outside so I could grind down the welds and blow a couple weeks of accumulated
dust out of the inside and allow me to give the garage floor a thorough
cleaning.
I did repair the bullet hole in the roof to test
an idea I read somewhere on the Internet. I used a 10p box nail, and it worked
very slick! The diameter of the nail head was nearly perfect to fill the hole,
and the nail is long enough to easily hold it secure while tacking in place. A
quick cut with the grinder and it was ready to go. It sure beats trying to
build up a weld or tack in a tiny piece of sheet metal, and now I have learned an easy
way to fill all the unused side trim mounting holes.
Tuesday, September 2, 2014
Post Labor Day Update
I’m still waiting for the decorative aluminum I ordered so I
can make a trim panel for a functioning mockup of the modified shifter. According
to the paperwork they sent, the stamping job was supposed to hit their factory
floor by 8-28, so I expect to hear something soon. In the meantime I rebuilt
the park lever assembly to closer tolerances, attached it to the shifter pod
and made a simple cover for it. No pictures yet.
The body hasn’t been getting much love since before Labor
Day, but this morning I did some final welding in areas that had previously
been only tacked together. The seams where the ’55 tail panel to
the ’56 quarter panels had to be joined needed some backing pieces behind them to make better
welds in the old metal and I’m about finished with that. I also installed the
final piece of trunk floor that had been held up for quarter panel replacement.
After reassurance from AAJ Brakes that everything was dimensionally
correct with the disk brake spindle modifications, I decided to thread the holes
to mount the caliper bracket. I should have checked earlier to see if a 37/64th
inch drill bit was available locally, and of course it wasn’t. I might be able
to get by with tapping the existing 35/64th hole, but the last thing
I want is a broken or jammed tap trying to remove too much metal, so will wait
for the right drill bit to arrive. Amazon says it should be delivered on 9-5,
so that part of the project goes back on the shelf for a few more days.
I’ve also been toying with the idea of installing rear
disks. I don’t expect to need the added braking capability, but the B-body rear end I installed
was missing all the brake parts, so the disk package from AAJ at a bit over
$600 wouldn’t be that much more expensive than having to buy a complete drum
setup. I thought I had drums in my stash that I could use, but discovered that they
are too far gone to be turned one more time. I haven’t checked the drums on the
Fury parts car yet, so the decision will likely hinge on their condition.
There was a picture posted from a car show of a '59 Plymouth that had been modified to emulate what a '59 Fury would have looked like if Chrysler had decided to keep the gold trimmed 2-door hardtop as a unique limited model. It was painted '57 Fury Sand Dune white and the result really impressed me. Since my Fury will not be stock, it might look better in the '57 color than in the modern Chrysler Cool Vanilla I had considered. Not that I really care, but it also might be less offensive to purists with perfect restorations if it deviates more clearly from the stock design. Another decision to make!
Here's the '59 with gold grille trim and gold anodized spear insert. I'm anxious to see the interior to see if I can get some ideas there.

Wednesday, August 27, 2014
Pushbutton Shifter Mods
When the temps hit 100*, I knock off work on the body and retreat
to the air conditioned part of my shop to play with the small projects still
waiting to be accomplished. The one I’ve been spending the most time on
recently is the modification of the stock ’56 shifter from the 2-speed
PowerFlite, to a 3-speed TorqueFlite with a Park handle,that operates with only one cable like the ’66 and later shifters used.
I’ve completed a prototype of the buttons and a lever mockup for the Park selector. Though I’ve not yet combined the two I’ll post some pictures so you can see what’s been done so far.


I’ve completed a prototype of the buttons and a lever mockup for the Park selector. Though I’ve not yet combined the two I’ll post some pictures so you can see what’s been done so far.
The shifter mechanism is from a ’64 that was modified by removing
the existing Park lever assembly and cutting off the shafts so it will slide into
the ’56 dash. There wasn’t enough dash space to use the vertical operating Park
lever, so removing it was no big deal. The fact that it operated a second
cable…the one that needs to be eliminated so I can use a later aluminum 727...meant it could not be easily integrated into the Fury.
First I designed the new button configurations, some of which you can see in the photo. I ended up remaking several buttons
while proving out their function and appearance, so was glad I ordered extra material. I used clear ½” Lexan, and it does a decent
job of transmitting light from the side to illuminate the buttons. The only
thing I dislike is not having found a source for green Lexan so it would look more like the
OEM PowerFlite lighting.
The button setup works fine, but unfortunately I had to swap
the N and R buttons from the factory locations, as the button length was too short
to make the transition without interference. I might have to remake a couple of
the buttons to make them align better, and all will need the ends polished
and the brass sleeves dimpled to hold them in place. I still wish I
could have found stainless tubing that size as it would look closer to stock.
However, since the Fury used a lot of unique gold trim, it might make these
parts less noticeable.
The last challenge I face with the buttons is finding
someone to engrave the letters and numbers in the ends. The biggest trophy shop
around said they wouldn’t attempt it as they had no way to mount the parts in
their machine, but they referred me to a place in another town that still does
some hand engraving. I tried engraving some samples with a Dremel, but they don’t
look professional, so I hope I don’t have to resort to that option. If I could
find a set of steel stamps for a reasonable price, they could probably be
heated enough to melt the imprint into the Lexan.
So far, I’m pleased with how the park lever operates. I
salvaged the spring from the ’64 assembly and used the original design to load and retain the lever into the park position and in the off position. The last
remaining feature of the selector panel left to design is the pawl that will operate
the linkage. Then comes the bell crank that will transfer the rather short linkage
movement to the longer stroke required of the shift cable. It will also have to be
adjustable to assure the proper gear is engaged when a button is selected. Once the pawl is designed, I'll rebuild the entire assembly to a tighter tolerance and make a trim box to cover the parts for neatness. An attractive cover for the park lever is also on the list of to-do's, but I'll probably just have an aluminum or brass plate engraved and bond it to the lever handle.
All in all, it’s been an interesting learning moment.
Sunday, August 24, 2014
All Body Patches Installed!
The last of the body patch panels have been installed, welds
ground, and bare metal prepped for priming. Still lots of small repairs and
welds to finish, but with the larger panels in place it feels like major progress
has been made. The fenders and doors need patches, but for now I’m anxious to
get enough parts together to roll around and to use as a base to build on.

I received the body mount pads yesterday, and the mount
hardware has been soaking in a mixture of lemon juice and white vinegar for
several days, so the rust is about gone. In theory I could install the body at
any time, but I’d prefer to accomplish a few things while everything is easily
accessible. I have all the parts needed to replace the suspension and steering,
and the disc brake conversion can be done at any time, so that would be the
logical next step. Decisions, decisions!
I would also like to install a cross member for the
transmission mount before the body goes on, but I haven’t decided what to use.
I have one from an old ½ ton Dodge that could be adapted without too much work,
but it’s awfully heavy. I suppose I could build one from scratch, but by the
time I figure out the dimensions and the stock is procured and cut to size, the
truck part could be long installed. However, I think the cleanest option would
be to find one of the removable center sections from a unibody Mopar and just
install stubs on each side of the frame to bolt it to.
Before anything can be done, I need to find the dimensions
between engine and transmission mounts so the cross member can be properly
located. That task will be complicated by the fact that I also need to install
brackets to accept spool type motor mounts. Sure wish I had pulled them off my
old Aspen parts car before I junked it!
I’m not having much luck locating a Poly engine. The only responses
to an online ad were from New England and Pennsylvania, so the shipping costs would
equal the price of the engine core! It’s hard to believe there isn’t something
available in North Texas. I thought I had found one just six miles away, as a
guy posted a Craig’s List ad for a 318 removed from a ’66 Dodge Coronet. Since
so many “A” engines have been replaced by “LA”s over the decades, I asked the seller
to check the valve covers before I went to see it, and naturally it turned out
to be an “LA”.
I did find a complete ’66 Plymouth B-body in East Texas, and
it also has the 727 transmission I want, but I don’t need the rest of the car
and the seller won’t pull the parts I need, even when told he could keep the rest of the car. By the time I had the car hauled 150
miles the price would be steep for a couple of cores, and I certainly don’t
relish pulling an engine behind the garage while the temps are in triple digits.
Saturday, August 16, 2014
Johnny Cash Museum
The Johnny Cash Museum in Memphis is opening this weekend and will showcase the crop of stars who launched their careers at Sun Records in the nineteen fifties, all of which are on my favorite artists list. Since Roy Orbison and his music found their way into so many scenes in my novel, and since a '56 Fury was one of the characters, and since the book's title was inspired by one of his hit songs, it only seems fitting on this weekend to link a 1956 ad for a show featuring Sun Records talent, when both my Plymouth and Roy Orbison were fresh on the scene.
Monday, August 11, 2014
Quarter Panel Replacement
Still working on the right rear quarter panel. It will be
replaced in three pieces, since full patch panels are non-existent. With the
discovery of more rust than expected behind the exterior metal, I was once again back to fabricating
replacement parts. The reinforcement panel over the wheel well was a challenge,
with multiple bends and curves, but I finally scabbed together a functional
substitute.

After prepping and painting the area that will be
inaccessible, I fit checked the largest of the three parts required to
eliminate rust damage. It actually fits quite well and only needed a tiny bit
of massaging. One cool morning this week, I’ll pull the car outside again and
finish the final grinding to match the edges.

Another FWIW…before replacing any panels, I practiced with
the flanging tool on some scrap metal and decided it was a big waste of time
and didn’t make fitting any easier than butt welding the new panels to the old
sheet metal.
Designing a five-button transmission shifter to fit in the
original Plymouth housing is turning into a challenge, but one I really enjoy.
The brass tubing arrived today, so along with the ½” Lexan that arrived last
week, I’m now ready to begin putting parts together. I’m first carving a set of
buttons out of wood to make sure there is no interference between adjacent
buttons during gear selection. If their shape and locations prove out, I can
make a new trim plate with five holes. When compared to the original PowerFlite
arrangement, the neutral and reverse buttons will be swapped, but the others
will be in the same position as later TorqueFlite layouts.
After that will be the real challenge of designing a park lever
and housing that looks like something that might have come from the factory. It
looks good on paper, so I hope it operates as expected.
The most worrisome problem I have at this point is if the
buttons will operate easily, or if the force to move the cable to switch gears
on the newer transmission will be excessive for selecting with one finger. I’d hate to have to revert to a
floor shift after all the time and money I have invested in the pushbutton
modifications, and there is no simple way to modify the throw distance except with a bell crank.
Tuesday, August 5, 2014
Exterior Patching in Work
Got my spindles with new kingpins back from the machine shop
and I don’t feel so bad that I couldn’t get them apart. They too had a devil of
a time if all the tooling marks visible by the lock pins are any indication. That
and the bill! Good thing I won’t live long enough to see this set wear out and
have to go through that again.
The driver's side front quarter panel patch is in.


I rolled the car outside again to grind welds and
prime the driver’s side repairs, and to cut out the lower quarter on the passenger
side. There was quite a bit of hidden rust that will require additional custom-formed
parts to repair the hidden panels, but since the afternoons are now too hot to
work long hours, progress will be slow. I’ll be spending more time designing
the custom interior until the weather moderates.


Speaking of…after a fruitless search for square or
rectangular thinwall stainless steel tubing to make the pushbutton shells, I
had to settle for brass. I really would have preferred stainless to more
closely match the OEM parts, but if the brass turns out to be a light color, it
should match the Fury gold parts okay. They notified me today that the brass tubing
has been shipped.
I also couldn’t get green ½” Plexiglass in small quantities,
so had to settle for clear Lexan. I’ll have to experiment with green lighting
to see if I can approximate the original parts, but if not, I guess it’s not a
big deal.
I’m still working the gold anodized side trim problem, but
the anodizing shop has yet to come up with an estimate, and since the original
pattern isn’t available in a roll wider than 7 3/4” I’ll have to make a
decision on a substitute pattern. With my planned modification, 9” would be
perfect, but anything narrower would probably look wrong.
And there is another tool glitch to make my day. Something
is amiss with my welder, and it’s becoming difficult to make good welds, even
with all new metal. It sputters and sometimes fails to start cleanly. The manual and an Internet search point toward
a bad connection, but everything is clean and tight, and the cables aren’t
damaged, and changing settings doesn’t help, so that’s one more opportunity.
Tuesday, July 29, 2014
Made in China
Made in China…three little words that make you cringe, and
here are a couple of examples of why.
As mentioned earlier, most of the parts for my Kanter
supplied front end kit were made in China, and they show it. Several parts were
incomplete or missing, while others have obvious, visual defects.
First, the little things. About half the grease zerks furnished
with the parts were the wrong size. Not a big expense to replace, but it gives a
nice warm feeling to realize the factory that made the parts got even the
simple things wrong, so what else did they screw up?
Well, for one thing they also gave only one seal for the idler
arm that needs two, but again that’s not an expensive deal, though it is
annoying. A bigger deal is the shape of the idler arm. As you can see, the
angle of the two threaded ends is different when compared to the OEM part.
Since my original is in good shape except for the bushing, I might use it,
since I have no idea how the idler arm shape would affect front end geometry.

Next is the upper shaft. Again the picture shows the
difference between the OEM and Chinese parts.

The holes in the Chrysler part
are centered on the shaft, while the Asian copy is offset to the point that it
certainly could affect the strength of the part, if not the function. I have no
idea how much stress is placed on those parts in normal driving, but I’ll
probably use the old part with new bushings. What a shame that parts nearly six
decades old appear to be in better shape than the freshly made, expensive
replacements from China.
Saturday, July 26, 2014
Paint and Pushbuttons
It was a perfect morning to move the body outside and finish painting the underside. Temps in the 70s and a light breeze to blow the paint fumes away. After it dries, there might be some touchup, but the bottom is now all black and protected from surface rust.
In an early post I mentioned that I was trying to figure out a way to retain the pushbuttons after I replace the old cast iron, cable-shifted, 2-speed PowerFlite with a mechanical linkage, later model, aluminum, 3-speed TorqueFlite. It's going to take some time to fabricate the unique shifter parts, but I finally have it figured out. I'll be able to use the stock housing along with a modified '64 Torqueflite shifter, but will need new buttons and a new trim plate made up for the five buttons.
I've found a supplier of the stock pattern aluminum material used in the '56 pushbutton trim plate and am only waiting for their price quote. I'll also be able to use it around the radio and on the custom consoles to lend a stock look to the modifications.
I'll have to make new buttons from either Lucite or Lexan, and finding a small quantity of 1/2" thick material for a reasonable price is proving to be difficult. Transparent green Lucite would be my first choice to match the OEM parts, but all I've found is big sheets that cost in the hundreds of dollars. I can find clear Lexan in small enough quantities, but even clear has sort of a smoky look and I'm not sure how well it edge-lights if I have to illuminate them with a green bulb inside the housing.
Here's what a stock pushbutton from '57 looks like:

Finding square or rectangular, thin-wall, stainless steel tubing to encase the Lucite buttons is equally frustrating. No supplier stocks 1/2" X 1/2", and the only company I can find that makes and distrubutes 1/2" X 3/4" will not respond to my email. I know they're not interested in selling small quantities, but I wish they had the courtesy to tell me who distributes their product. I'd use aluminum, but since I have to shape it around the ends of the buttons, it would be difficult to make it look good. Stainless can be cut and welded and polished, but thin aluminum is a different matter.
Adding a park feature to stock pushbuttons has always been the obstacle when using a later transmission, but since my interior will not be stock, I'm going to add a push-to-engage lever below the button housing. With a '56 Plymouth it will be fairly easy, since the area below the buttons is unobstructed, but once again, I'll want stainless steel trim around the lever to make it look similar to what a stock design might have been in '56.
If anyone has info or suggestions for the pushbutton issues, please email me at: Fury56@horizons13.com
In an early post I mentioned that I was trying to figure out a way to retain the pushbuttons after I replace the old cast iron, cable-shifted, 2-speed PowerFlite with a mechanical linkage, later model, aluminum, 3-speed TorqueFlite. It's going to take some time to fabricate the unique shifter parts, but I finally have it figured out. I'll be able to use the stock housing along with a modified '64 Torqueflite shifter, but will need new buttons and a new trim plate made up for the five buttons.
I've found a supplier of the stock pattern aluminum material used in the '56 pushbutton trim plate and am only waiting for their price quote. I'll also be able to use it around the radio and on the custom consoles to lend a stock look to the modifications.
I'll have to make new buttons from either Lucite or Lexan, and finding a small quantity of 1/2" thick material for a reasonable price is proving to be difficult. Transparent green Lucite would be my first choice to match the OEM parts, but all I've found is big sheets that cost in the hundreds of dollars. I can find clear Lexan in small enough quantities, but even clear has sort of a smoky look and I'm not sure how well it edge-lights if I have to illuminate them with a green bulb inside the housing.
Here's what a stock pushbutton from '57 looks like:
Finding square or rectangular, thin-wall, stainless steel tubing to encase the Lucite buttons is equally frustrating. No supplier stocks 1/2" X 1/2", and the only company I can find that makes and distrubutes 1/2" X 3/4" will not respond to my email. I know they're not interested in selling small quantities, but I wish they had the courtesy to tell me who distributes their product. I'd use aluminum, but since I have to shape it around the ends of the buttons, it would be difficult to make it look good. Stainless can be cut and welded and polished, but thin aluminum is a different matter.
Adding a park feature to stock pushbuttons has always been the obstacle when using a later transmission, but since my interior will not be stock, I'm going to add a push-to-engage lever below the button housing. With a '56 Plymouth it will be fairly easy, since the area below the buttons is unobstructed, but once again, I'll want stainless steel trim around the lever to make it look similar to what a stock design might have been in '56.
If anyone has info or suggestions for the pushbutton issues, please email me at: Fury56@horizons13.com
Friday, July 25, 2014
First Exterior Sheet Metal
I've been sort of task jumping, but have accomplished a few things.
I installed the first exterior patch panel and the complicated door corner that had to be made from several pieces of metal. I originally bought a corner piece for a four door, as the seller advertised the shape to be identical to the two door. Not so. I salvaged what I could, but it was mostly a cut and form process, and it's not pretty. The shape is okay, but will take a lot of time to fill and finish.

I decided to paint the floor to give it more protection and scratch resistance than the soft primer was able to provide. It's not the correct white, and will be painted over with the right shade later.


When the heat of the afternoon drives me into the house, I've been researching and ordering parts. The center link is on order. Also had to order two tie rod adjusting sleeves, as the old ones were too damaged to salvage.
I gave up trying to drive out the king pin locks, so I took everything in to a shop to have them replaced. I hate giving up on a challenge, but it's not as if I can't find things to keep me busy.
I'm also working with a patterned metal supplier to see if they can reproduce the Fury spear insert, but it doesn't look encouraging. The cost of tooling up for a reproduction part that has a limited market would be very expensive, so I'll probably have to compromise the pattern, or even worse, have to resort to a vinyl graphic. My original parts are too corroded and damaged to even attempt to salvage them. At least that's not an immediate worry.
I installed the first exterior patch panel and the complicated door corner that had to be made from several pieces of metal. I originally bought a corner piece for a four door, as the seller advertised the shape to be identical to the two door. Not so. I salvaged what I could, but it was mostly a cut and form process, and it's not pretty. The shape is okay, but will take a lot of time to fill and finish.
I decided to paint the floor to give it more protection and scratch resistance than the soft primer was able to provide. It's not the correct white, and will be painted over with the right shade later.
The underside of the body is half painted and will wait for a cool morning to finish. I had to add some more seam sealer, so wasn't able to paint it all in one session.
When the heat of the afternoon drives me into the house, I've been researching and ordering parts. The center link is on order. Also had to order two tie rod adjusting sleeves, as the old ones were too damaged to salvage.
I gave up trying to drive out the king pin locks, so I took everything in to a shop to have them replaced. I hate giving up on a challenge, but it's not as if I can't find things to keep me busy.
I'm also working with a patterned metal supplier to see if they can reproduce the Fury spear insert, but it doesn't look encouraging. The cost of tooling up for a reproduction part that has a limited market would be very expensive, so I'll probably have to compromise the pattern, or even worse, have to resort to a vinyl graphic. My original parts are too corroded and damaged to even attempt to salvage them. At least that's not an immediate worry.
Subscribe to:
Posts (Atom)