Search This Blog

Tuesday, October 28, 2014

Fuel Tank Install-Rear Brake Buildup

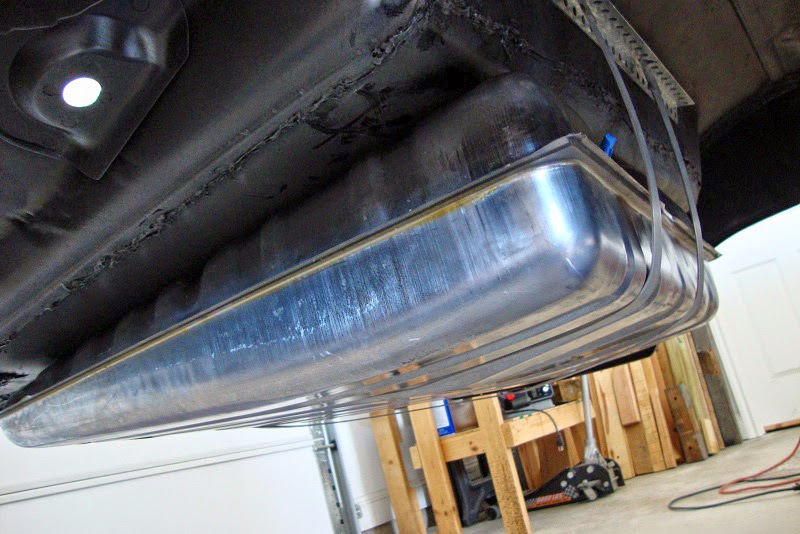
Last parts for fuel tank and rear brakes received. 1964 B-body tank is perfect for my custom installation. Took two days to temporarily install for fit and measure for permanent mounting brackets. All parts are very high quality. Hinged license plate bracket ordered 10-27.


Rear brakes are assembled onto backplates and ready to install. Double flaring kit and copper/nickel brake line are very easy to work with, and well worth the few dollars extra over steel line. Had to order different center-flex line as B-body banjo style was too short. Used '73 Dodge truck part that was five inches longer, and barely long enough.


Sunday, October 19, 2014

10-19-14

Ordered a roll of copper nickel brake line and fittings, double flare tool, fuel tank neck, insulator pad, grommet, straps and sending unit.

Finished cleaning the remaining salvaged brake parts.

Friday, October 17, 2014

10-17-14

1964 B-body gas tank arrived and looks to be perfect fit with relocated filler neck! Made in Canada and looks very high quality. Not sure about which straps will work best, but will order '64 straps and make them fit.

Fabricated cover for vent opening and welded in place. Rear brake parts starting to arrive. Still need shoes, axle bearings and axle gasket.


Tuesday, October 14, 2014

Brakes Arrived and New Parts Shipped

Only two days to get 11" brake back plates from Spokane. They were cruddier than they looked in pictures, so disassembled and started cleaning and de-rusting. Ordered gas tank and brake drums and cylinders 10-13. Notified all were shipped 10-14.

Sunday, October 12, 2014

Pitted Area Repair


Moved outside to glaze and sand localized pitted areas and tail panel.

Control arm bumpers arrived from Gary Goers ten days after I sent in the order. Parts look very nice.

Bought 11” X 2-1/2”rear brake backing plates and guts from Spokane individual on e-bay. Need to order drums, cylinders and brake lines. Will also replace wheel bearings, seals and gaskets as long as the axles are being pulled.


Friday, October 10, 2014

10-9-14

Repaired small pitted areas around windshield with metal, filled, sanded and primed.

Removed and cleaned rear brake backing plates and drums from Fury. Unable to identify original donor model as drums don't match any dimensions found in Rock Auto catalog. Looking for Internet help.

Wednesday, October 8, 2014

Changes

In the past I've tried to make regular entries, provide pictures and text to explain my progress, and sometimes to simply share my thoughts. Since that didn't work very well, I've decided to turn these pages into nothing more than a journal for my personal use. However, it will remain public and if anyone chooses to drop in, they are welcome, but shouldn't expect anything more than a few pictures and notes to myself.

Sunday, October 5, 2014

Facing Reality


I began this ’56 Plymouth rebuild blog four years ago with the idea of sharing my frustrations, successes, and learning experiences with others contemplating, or already immersed in a restoration project. Because my car is an oddball make and model there wasn’t a lot in the way of body parts that could be ordered from a catalog, and the people who knew and had experience restoring these cars were few and far between, so the task was intimidating. Boy, was that an underestimation!

What I was unwilling to accept was that we truly live in a belly button world and for every person interested in a ’56 Plymouth there are a hundred thousand sheep enamored with ’57 Chevys. I had hoped to attract readers who wanted to see what else is out there from the glorious fifties besides Tri-five bowties, but apparently there is even a smaller handful of people who fit that description than I thought.

In those four years, despite blog links in my signature on a dozen car and motorsports forums, I’ve managed to attract a grand total of one follower, and while I’m grateful for his interest and loyalty, it’s rather foolish to continue writing for a nearly empty house. I know that some of you drop in periodically, and others stumble in with a web search, but for the most part, there is no interest in either the car or my narrative. Even my letters seeking information and guidance from “recognized Mopar authorities” go unanswered, so I’m pretty much on my own when it comes to research. I can’t even discuss the project on the Forward Look forum, as there is so much ingrained opposition to modifying any part of the original factory design and I’ve discovered that it’s counterproductive to ruffle the feathers of purists. Although it sometimes takes a while, I eventually get the hint.

I think the time has arrived to back out gracefully, with heartfelt thanks to the few who took the time to read my posts, offer suggestions and encouragement, but more importantly just for being an Internet friend with similar interests.

At my age, there is a real possibility that my project may never see the street. However I intend to keep chipping away, and maybe someday I’ll be able to post photos of the old Plymouth under power. If so, it will probably be similar to what a friend used to tell me when he had accomplished something he was proud of, but had been dismissed or ignored by others…”It’s like wetting your pants in a dark suit, you get a warm feeling, but nobody notices”.

Sunday, September 28, 2014

It Rolls!


After two and a half years, there are four wheels on the ground again. The front suspension is installed, along with the wheel portion of the disk brake conversion kit. I couldn’t mount the calipers yet as there isn’t enough room inside the 14” roll-around wheels. The 15” Cordoba wheels will cure that, and since it will be a while before brake lines will be installed, there is no reason to mount calipers and expose them to the weather.
 

I had a couple of issues while installing the AAJ brake kit, but nothing that wasn’t easily resolved, and it wasn’t a fault of the kit. The first was very minor as there was an interference fit between the adapter and the spindle casting on the right side that was cured by grinding a small notch in the adapter.

The left side had a different problem as the spacing of the holes to mount the adapters and the steering arm was slightly off from the spindle holes. It was only .02”, but because of the close tolerance, I had to slightly oval the bracket holes to get the bolts in. Although they appear to be original, the spindle castings have several minor but measureable differences, including that hole spacing. Different Chrysler suppliers is my guess.
 

Another minor issue that might be applicable to others installing this kit was the fit of the main castle nut. After tightening, and backing off enough to free the wheel to spin easily, the cotter pin couldn’t be installed. Deepening the notch in the nut by a few thousandths fixed that. So far, the brake kit parts seem to be high quality, precision made and even the smallest parts have been supplied.

I wish I could say something similar about the Kanter supplied, Chinese sourced, front end kit, but it’s a real disappointment. Besides the problems identified in a post several weeks ago, even more surfaced today. The most irritating problem was the threaded bushing dimensional tolerance. The outer threads were not cut accurately and the bushings would bind while being installed in the spindles and control arms, so once again I had to use some of the old bushings in order to make everything work.

The grease seals are cheaply designed; with some being nothing more than glorified garden hose gaskets. They fit loosely and don’t cover the open areas, leaving gaps where dirt can penetrate down into the threads. They will probably be adequate for a fair weather car, but if the kit was to be installed on a daily driver, parts wouldn’t last very long once exposed to a steady diet of dust, water and mud.

The holes for the grease zerks were also not tapped properly and several had to be re-threaded. If it hadn’t been for the hardened grease in the old front end parts, I believe I would have been better off buying only a king pin kit and tie rod ends, but boiling out and using all the old parts along with new zerks and seals. It would have been much cheaper and the quality probably as good. I wonder if American consumers will ever get tired enough of crappy Chinese goods to stage a buyer’s revolt? I know that after I install the last pieces of this Kanter kit, they will be on the receiving end of a very nasty letter.

One final comment on the front end and brake install. Yes, with moderate mechanical skills, a novice can do all the tasks required to rebuild and/or install the parts, but would be hard pressed to do it all without a shop full of professional grade tools. If you don’t have access to the right tools and you had to buy everything required to do the job, you would be much smarter financially to forego ordering tools of unknown quality and save the money to have your local machinist to do the hard parts. That said, the spindle holes that I had the machine shop tap were done with a tap that did a rather poor job of cutting and the bolts would start to bind before going more than three or four threads deep. Fortunately, the tap I had previously ordered finished the job just fine.  

Wednesday, September 24, 2014

One Step Forward...One Step Back


I thought I had everything needed to assemble the front suspension, but realized the control arm snubbers were not included in the rebuild kit from Kanter. They were part of a kit from another source, and I missed the fact that the one I bought does not have them. I fired off an order to Gary Goers this morning, so Hope he can get to it quickly. I can still assemble most of the suspension and brakes, so it’s not a big deal, but I have to pay better attention when ordering parts.
The trophy shop finally completed the engraved legend plates for the shifter, so one more step is complete. I hooked it up to 12VDC and it looks okay, though I’d still like the numbers to be better. Now I'll box it up for storage until I find a transmission.


Got the Belvedere trim holes filled in the quarter panels and applied a few coats of Bondo. I really don’t care to do body work, but unless I want sanding dust in unreachable areas, most of it needs to be done before joining the body and frame. The pictures are blurry, but my cheap camera does that occasionally and I’m sure everyone has seen enough Bondo applied to make that unimportant.