Monday, November 12, 2018
White Christmas - I Wish I was Back in the Army
With the serious observation of Veterans Day behind, and Christmas not far ahead, I'll post a scene from my favorite Christmas movie. It sort of reminds me of myself in the mid-late sixties.
I left active duty in May of 1963, before any serious fighting began in Southeast Asia. When the shooting began, I tried to reenlist, but the Air Force recruiters were swamped with draft-avoiding applicants who had no desire to serve in the infantry. With all those eager-beavers hoping to get into Air Force and Navy technical jobs, the AF wasn't taking prior service vets unless they were already qualified in the combat career fields. To top it off, they weren't even letting those guys retain the rank they held previously. I had been on a tactical missile combat crew, but my missile was being phased out, so I couldn't even get my old job back.
Since I was married with two kids, there was no way I could afford losing a stripe in any situation. Military pay really sucked in those days, and promotions were very slow. I even considered joining the Army, but would have had to start all over by going through basic training again as a private E-2! Despite being on the AF recruiter's list in two states, it was 1972 before I was able to reenlist as an Active Reservist, but I retained my old rank. It all worked out well in the long run, and I spent another nineteen years having a job I loved.
Getting things around here ready for winter has brought car restoration to a screeching halt. When I do get a few minutes of my own, I work on wiring hook-up charts, but have hardly picked up a tool recently.
Winter has already arrived with a blast. From hot and rainy a few days ago, to heavy-coat weather the last week. Tonight we are expecting our first snow flakes to arrive, but nothing serious...with the exception of a cold north wind! My remaining tomato plants survived the first freeze when I covered them last week, but I doubt they will make it when the temps hit the low twenties tonight.
It looks like it will be early December before I can get back to the Plymouth, as my wife will be traveling to Las Vegas to spend the holidays with her son and his family. One dog and I will take care of things around here while she's gone, and the dog won't have a list of things she wants done every day! Besides, she only weighs ten pounds, so I'm still her boss.
Friday, October 19, 2018
How High's the Water Mama?
Not five feet high yet, but my entire yard is a few inches deep and it's still raining. The ditches are running like trout streams!
This is the wettest autumn in the Texas record books. With 2-1/2 months to go this year, we are already 11 inches above the average annual rainfall!
Worse than the rain is the wintery temperatures. I've never had to turn on the heat before November, but it's now been on for two weeks. When this latest cold front moved in two weeks ago, it was 16 F in the northwest panhandle, and 98 F in South Texas!
Car-wise, I'm still working on wiring. Seems like every time I install a few wires, I think of a better way to route them, so rework is the order of the day. If I could find better schematics online, it would go faster, but the search engines are so biased, whenever I look for Mopar diagrams the vast majority that come up are Chevy and Ford.
Thursday, October 11, 2018
Final Answer!
If you’ve followed earlier posts about my steering wheel quandary,
it looks as if I finally made a decision about what I want.
I started lacing the leather steering wheel cover in place a
couple days ago, and despite many interruptions and a few frustrations, it is
finally done.
The reason for a different steering wheel was partly
because the Hollywood style rim was crumbling junk, which meant an
expensive repair. The optional horn ring was surprisingly nice, but still needed re-plating,
and since it’s pot metal, that too would cost a lot. Also, the splines on the
stock Plymouth shaft were not the same as the truck shaft, meaning one of the
parts would have to be reworked. More expense.
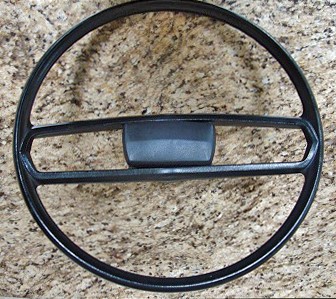
This is the Hollywood style horn ring:

Since I wasn’t especially fond of the chest-crushing point
on the Hollywood horn ring, I decided to focus the wheel choice on a later,
stock Mopar wheel for a base to build on, and do my best to customize it to
look a little more like a possible fifties style.
I decided the stock wheel I removed from my ’73 truck was the
best choice. It was the same depth as the one in the Plymouth, and it was the
same 17” diameter. The other wheels I had available were smaller and without
power steering I needed a larger wheel.This is the way it looked in my truck:
The seventies-style plastic-look didn’t seem right for a ’56
interior that boasted lots of brightwork, so the wheel I designed had to better fit in.
The main styling feature I wanted to keep was a stock ’55-’56 center cap from
the standard equipment wheel. As mentioned in a previous post, I did that using
a road wheel aftermarket cap that I cut to fit. Since I also wanted a large
expanse of chrome, I made sheet metal pieces to fit between the spokes, and after seeing
them plated, I’m pleased to see them look so nice.
This is what I ended up with, and I think it
fits in quite well with the modified Fury interior:
If I had used an aftermarket steering column and wheel, or restored the stock parts, the bill would have likely been well over $3,000. Using all Chrysler parts from my collection and mostly my own labor, the bill came to less than $500, including plating and leather cover!
Tuesday, October 9, 2018
Steering Wheel Status
The chrome shop delivered my horn-bar parts at 0900 this morning, and they did the usual beautiful job of plating. I can't say enough good things about the way they treat their customers.
I epoxied the mounting hardware in place on the back of the chromed parts, so they will be dry by tomorrow morning and I can fit check everything.
When the mail arrived, I was surprised to find the leather wheel cover in the mail box, especially after the Monday holiday, so it took only two working days from California to my door! I now have all the parts I need to complete the steering wheel, so I got anxious and started lacing the cover in place. It's a slow process, and brutal on the fingers that I use to pull the lace tight, so I'm not sure when I will be done. I'll hold off taking pictures of the wheel until it's complete.
Wiring continues to be frustrating. I'm more than a little bit unsure about the column-mounted ignition switch in the '73-'76 truck column I'm using. I just noticed that the pigtail wire that carries power to the windshield wiper motor is AWG 14 on the hard-wired ignition switch, but the '56 body wiring diagram shows a 10 gauge for that circuit. Sounds like melted wires waiting to happen. The stock truck wiring was not well designed, and melted wires inside the column and fried switches were far too common, so I might have to reroute or add some new circuits and pick up the wiper power from a different source.
The wiring issues are quickly becoming my least favorite part of the project!
Thursday, October 4, 2018
Shock and Awe!
More than once I've decided against a part or a modification because of price, but the price I was quoted by Dallas Steering Wheel to install a leather wrap on my steering wheel about put me into cardiac arrest! Their website ads show several European Super Cars, and I suppose I should have expected that those were the target customers for their products. Whatever, their prices are way out of my league.
The shock: They wanted $500 plus tax and shipping for two-tone leather and 1/8" padding. That's $475 more than what it cost for me to wrap the one on my truck. So, I decided to also do this one myself using a Wheel Skins single-color wrap over the 1/8" padding I had left over from when I installed the generic leather cover on my '73 D100. The high quality, custom made leather cover I'll use this time will be around $60 plus shipping. Not quite as pretty as the two-tone would have been, but for ten percent of the cost, it will do just fine!
I got started installing the padding yesterday, and the cover should be here in about a week.
The awe: I took the homemade horn bar parts to the plating shop in Gainesville, Texas yesterday. They quoted about $150 to plate the two parts, and a three-week wait, so I'll be getting back to wire routing for a while. Then, this morning they called and said they had squeezed them in between bigger jobs, and that I can pick them up this afternoon!
I'll go after them sometime tomorrow, and maybe I can have some pictures to post if I can get them mounted on the wheel.
The guy I dealt with at the chrome shop was interesting to visit with. He's eighty-one years old and works as a consultant two days a week after a lifelong career in the plating business. Four years older than me, and still working, while I've been retired for twenty-one years!
What made him interesting was his hobby as a top-fuel and funny car owner-driver for many years from the late fifties until the mid-eighties. It's interesting to hear the stories from the heyday of drag racing. He said he left when it was no longer a sport between friends.
Saturday, September 29, 2018
Catching Up One More Time
Now, where was I when the demands of daily life interrupted
my old-car playtime?
Ahh, yes…several things. First, a four-day visit by daughter and her
family from Washington state. They felt right at home as we received a record September rainfall total. Other things included the better part of a day installing security cameras and hanging
pictures in granddaughter’s new rental house, building shelves in wife’s art studio, lawn cutting, weeding and trimming between downpours, repairing plumbing, repairing
lawn equipment, and a dozen other unexpected honey-do’s helped put a crimp
in my car-related plans.
Computer problems also returned. Everything in my browser locked up and it took half a day to figure out how to unlock it. It wasn't hacked, it just lost all the settings and I had to reset everything, including every password!
The rains have made this part of Texas the greenest I’ve
ever seen it at this time of year. Of course, that means mowing my acre and a
half every five days. More work, but I love the fresh look, and watering grass and shrubs in this clay soil is expensive. Some flowers that normally bloom in spring are even making a second appearance!
Yesterday, I managed to fabricate the remaining custom parts
needed for the steering wheel, but the epoxy adhesive I used to bond parts
inside the center cap apparently didn’t like the damp weather, and never set up
properly. I’ll have to find a product that tolerates high humidity better or
wait for the air to dry out before bonding metal to metal.
At least the horn rim parts that will be chrome plated only
need final tweaking and polishing before I take them to the plating shop.

Then it’s back to wiring the interior, since I now have connectors
and terminal lugs to finish the steering column bundle. I hope other demands for my time don’t pull me away from the car again, until I at least reach the point that I can install the dash and console.
While I'm at it, there was a Facebook question about the location of a body part on a '56 Plymouth. I took a picture of my installation on posted it there. If you don't visit Facebook, here's the picture of the rub strip that protects the quarter panel window frame.

Finally, here are some photos that Geir Broen sent me of his Plymouth projects in Norway. His clean '56 Savoy is in storage for the winter, and he's working on the '55 station wagon body while the chassis is also in storage. The engine for the '55 is a 241 Hemi from a '54 Dodge.


As usual, body mounts are badly rusted, so he had to make replacements for the rear. I'm really impressed by the quality of the fabricated parts!


Monday, September 17, 2018
Steering Wheel Mockup
It’s been an interesting wait for parts and materials to
arrive. Since I couldn’t do much with the wiring until I got parts, I took off in a
completely different direction.
For literally years I’ve been trying to decide what style
steering wheel I wanted. I didn’t really like any of the aftermarket designs,
as they don’t look right on a ’56 Plymouth, but after I changed the original plan to use an
aftermarket Ididit steering column in favor of a 70s Dodge truck part, there
were suddenly many different stock wheels to choose from, but despite a wider
selection, none of the stock wheel looked like it might have been a factory
product in fifties.
A couple of the smaller diameter OEM wheels might have looked
good enough, but with manual steering, I decided that one a 17” rim was almost a necessity. While
waiting and procrastinating, I suddenly visualized what I wanted, and I’m glad
to say that it’s based on the stock ’73 part from my own truck when I replaced
it with one from a ’76 Cordoba!
So, for much of the last three days, I’ve been designing
parts to make modifications using the OEM center cap with the Plymouth ship
logo that came from the Fury parts car and a horn switch from a Volare wheel.
To make the horn bar design appear more period-correct, it
had to be bright to match the dash and interior trim, so I started with a stainless-steel
center cap from a big truck road wheel and cut it to fit. Horn bars
are made from 18ga sheet metal that will be chrome plated to match the center cap. Not sure if I will need to add anything to make it look more stock. I'll decide that after the rim is leather wrapped to match the upholstery.
I know the description is confusing, but here’s one photo that
shows some of the basic parts loosely assembled.

Meanwhile, I received the new fuel pump for my truck from
Rockauto, and got it installed. Like everything else, it took three times as
long as it would have when I was younger and more agile, but at least it’s in, and
the engine fired immediately. One other good thing that was discovered was that
when I removed the filter, the short rubber hose that attached it to the tank line
was badly deteriorated and would have soon sprung a leak. It’s funny that the
piece between the filter and the carburetor line was like new, yet they both
came with the filter and were installed at the same time.
Last, but definitely not least! Geir, the knob you sent arrived on Saturday and it’s mounted,
so here’s a poor photo of the completed tach panel.

Friday, September 7, 2018
Waiting Again
Once again, I’m awed by the number of things it takes to essentially
build a car from scratch. With temperatures remaining near the 100*F mark again,
my days in the shop are short, so instead of attacking bigger and more visible jobs, I’m
taking care of many little things that have been put off at various points. There
are wire bundles to re-tie, screws to install or replace, paint to touch up,
clamps to install, etc.
My recent effort was to finish all the under-dash wiring. By
the time I was 90% complete, I found myself with a tangled and ugly mess in the
area above the steering column. Too many individual crimped-disconnects to keep the bundle looking neat,
so I decided to stop and replace the disconnects with a couple of multi-pin
connectors to terminate wires from the steering column outward.
I first tried to locate mating connectors from my stock of salvaged
parts from other cars, but nothing really worked out well, so I ordered a set
of Delphi Weather Pack connectors that use the same contacts and tooling as the
new bulkhead connector. They won’t arrive until next week, but I think the wait
will be worth it.
The wait for parts will give me time to revise and update my
hookup block diagrams in the cool of the house. Once again, I’m having to make wiring
changes to accommodate integration of stock OEM switches, additional new equipment,
and modernized circuits.
And just to add annoyance to my life, my truck decided it
didn’t want to start. I was going to back it out of the garage so the door will
open far enough for me to crawl behind the dash to verify some color code differences
in the main bundle. My truck is a ’73, while the column I transplanted into the
Plymouth is from a ’77 or ’78. The new ignition switch I installed is common to
both columns, but is wired differently and I can’t check the differences until
I pull the truck far enough out of the garage to see the connections.
In this hot Texas weather, if a car sits more than a day or
two, all the fuel in the carb evaporates and the engine must crank until the
carb is pumped full. The truck has been sitting for about two weeks, so I didn’t
think too much about it not starting immediately, but I finally realized that apparently
no fuel was getting to the carb. A shot of starter fluid made it fire off to
verify the ignition is fine, so now I have to pull the fuel line to see if it’s
pumping. To do that, I have to move some junk from in front of the truck so I
can crawl into the engine bay to reach the lines. Everything I've done lately seems dependent upon doing something else first!
Even though the fuel pump was replaced when I rebuilt the
engine about 2,000 miles ago, I’m guessing it died. It came from Rockauto, so
is probably another quality part from China.
Tuesday, August 21, 2018
Console Switch Mods
Console wiring took a back seat to a need to design a
different way to mount the HVAC switches. Originally, I mounted them directly
on the front plate with the aluminum trim in place. When I tried to wire the
switches, I found it difficult to see the wired terminals, so I decided to
mount the switches on a smaller bracket that could be removed from the console
for better access and visibility. I
threw together a quick mockup and it works fine. In fact, it works well enough
that I’m not going to make a neater permanent bracket. It won’t be visible when
the trim is installed, so why waste time making it pretty when it functions
perfectly well as is.


While I wait for that I’ll make a few wiring changes in the
dash bundles before the dash is installed. I expected a need to revise some
circuits as I got deeper into the merging ’56 and ’66 parts with the truck
steering column wiring, and it was a good guess.

FWIW, I still need another knob like the ones shown in the
last photo. If anyone has one they can spare, please let me know. It can have
any engraved legend, as I will fill the engraving with Muggyweld before having them
re-chromed.
Monday, August 13, 2018
It Must be Raindrops!
Rain at last!
I had begun to think we had seriously angered the rain gods.
There have been several heavy rains within a few miles of us in the past two weeks, but we received nothing more than sprinkles until yesterday. Yesterday morning I found 1.35 in the rain
gauge, and over last night, another 1.40 fell. Then it started again this
morning and so far, we added another 1.25 to the total. We could use another inch or two before it quits, but I'm very happy with what we got! The three-inch wide cracks in the clay soil should close for the season and I can probably stop hauling hoses around to water shrubs every few days.
Before the rains began, the temperatures were in triple digits
again, so a couple hours a day working on the car was all the air conditioner and I could handle. I'm still routing
and terminating under-dash wiring, and it’s still a slow process as I have to
create hook-up information as it happens, so I can keep track of the
configuration for future reference. I'm nearing the point where I can permanently install the console frame, and soon after that, the dashboard can go in. Hooray!
With luck, the weather should moderate soon, as the nights
are getting cooler and longer and I can open the garage doors in the morning to cool it off.
Now if I can just pump up my enthusiasm a few notches! Seeing the interior come together should help that problem a bunch.
Subscribe to:
Posts (Atom)