Search This Blog

Monday, March 21, 2022

First Day of Spring Progress Report


I always knew the wiring would be a problem, but I grossly underestimated just how much of a problem it would be.

For those who may not have read or recall all the crazy ideas I proposed on this blog, it was my plan to integrate circuitry from several different years and models of Mopar vehicles, plus new circuits for additional aftermarket equipment. With that in mind, here is a quick summary of the goals.

I wanted to keep the interior looking mostly stock, or at least similar to period correct, so all the switches and controls were seventy-year-old originals, except for the HVAC controls which are modern switches with OEM knobs and custom mounting.

The gauges are aftermarket but resemble the originals in appearance. However, the gauge internals and sending units are the latest modern designs.

The steering column with ignition switch is from a late seventies Dodge pickup.

 The 318 engine and transmission came from a ’66 Plymouth. The electronic ignition and updated charging systems are based on several model year Chryslers and Mopar Performance parts.

Headlight wiring is modified with upgraded wiring with relay operated switching for improved headlight performance.

Engine cooling is via a SPAL electric dual fan system with Painless controls.

HVAC system is from Vintage Air.

Aftermarket electrical additions are power front windows, backup camera, power bucket seats from a 2001 Chrysler convertible and a Radio/GPS from Kenwood.

I moved the battery to the trunk and added two fuse and relay panels to accommodate all the new equipment and to split loads on a couple of the original ’56 Plymouth circuits.

Trying to integrate all those wiring additions and changes, has been challenging for my untrained and aged mind, so that’s what been keeping me occupied all this time I haven’t been posting.  

My biggest frustration has been discovering the numerous wiring errors I made. Having spent most of my life packaging and wiring commercial aircraft and military electronics packages, I’m ashamed to find more than a half-dozen dumb mistakes! So far, besides the mis-wires, I found two wires I hadn't installed, plus a couple of bad connections and a defective wire segment.

The best surprise is that so far I’ve not found any mistakes in my circuit layouts…but I’m sure that will happen before I’m done! The second-best thing is that doing all this work alone means I’m getting my physical exercise climbing in and out, up, down, and around and under that damn car all day. I haven’t been on the treadmill once but I'm still exhausted by day's end.

Sorry, no pictures to show, since I don’t want anyone to see the mess I made having to untie and open my nicely routed wire bundles for troubleshooting.

Here’s my progress so far:

I have headlights, but only dims. No wiring reason fond for not having hi-beams. Everything is good all the way to the terminal board on the radiator support, so I’ll have to open up the front bundle to find the problem. Since I also don’t have front park lights or turn signals, the problems might be related.

I have taillights and both the turn signal switch and indicator work, but without the park lights it won’t blink.

Gauge lights work, except for the speedometer. Since all the gauges are jumpered together it probably means a bad light or connection in the speedometer. I tested the assembled dash before I installed it and it worked fine on the bench. That problem might be a real pain to fix as there is so little room behind the dash. I hope I won’t have to remove the dash.

Yet to be static tested are the HVAC controls, tach, radio, interior lights, power windows and all the things that will have to be functionally tested once the car is running. At the rate I’m going, that may be never!

Tuesday, February 22, 2022

82*-28*

 That's the temperature range the past two days...a 54* swing in less than 24 hours! 

Yesterday I was wearing a tee-shirt and sweating profusely in a summer-like 82F while testing electrical circuits under the hood.  Last night we had high winds and ,75" of rain. This morning it was 28F with a cold NW wind, and tomorrow the forecast is for freezing rain and temps remaining below freezing all day. Such is the nature of North Texas weather.

Yesterday was a big day for the old Plymouth. I've owned the car for about 12 years and it's the first time it has had a battery installed and power applied. So far, I've hooked up only the main power circuits and verified that all the buss connections were working properly. 

The first fuses I installed were for the lighting circuits, and immediately ran into a problem. No lights! First things I found were two mis-wired relays in the modified headlight circuit. When I was laying out the wiring diagram, I made a simple drafting error, and the electricity didn't like that a bit! 

After I fixed that problem, I discovered 2 to 5 volts in the console where I should have had 12 volts. It didn't take long to find a ground problem, but it was time to quit for the day, and now winter has set in again, so I doubt I'll be spending much time in the garage until the weather warms up again. Looks like that will happen early next week.

Meanwhile, I spent part of today repairing a section of privacy fence the wind took out during the storm last night. I've been trying get a fence company to replace the sections with the post problems, but they are so busy I had to make an appointment three weeks in advance, just to get an estimate! Who knows when they will be able to do the job!

Saturday, February 12, 2022

Electrical and Exhaust

 The wiring job is finally nearing an end, and none too soon as it's been far more difficult than expected. I still have a few things to finish, but they can wait until continuity and isolation tests are complete so I can apply power to most of the car. We have a couple of nice days in the forecast next week, so maybe I'll be able to accomplish that without too much smoke and fire! 

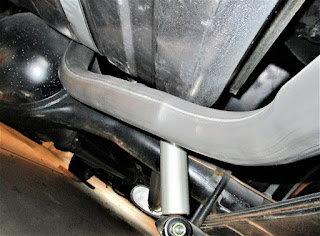
I discovered a rather big problem with the exhaust system. The left side muffler and tail pipe are tucked up close and clamped and it looks like it will everything will clear okay, but the right side is a different story. The tailpipes are stock Fury configuration, but the gas tank is not, and the two parts collide near the right front corner of the tank. Looks like the car will eventually have to make a trip to the muffler shop for a tailpipe modification.

There will also be problem where the exhaust pipes cross the transmission mount crossmember. I knew the crossmember would have to be notched to clear the pipes but wasn't sure exactly where and how much needed to be removed. After spending much of yesterday under the car on cold concrete, my old body is not looking forward to that notching job!


For what it's worth, I know a few of my blog visitors have read my novel, so I'll just say that I was informed that the inspiration for the female character in the story passed away last week. She was a wonderful person and will be missed by all who knew her. Also lost a couple of childhood friends last month.  Getting old sucks.

Friday, January 28, 2022

Finally Back to Work!

When the mornings are too cold to work in the garage, I've been working on a couple of jobs on the computer. The first image is for my friend Phil who is restoring a real '56 fury and needs a complete set of hood letters. He has a guy interested in casting them in plastic if we give him dimensions to work with. This is what I was able to do with Microsoft Publisher, so I hope he can come up with something to play with.

 
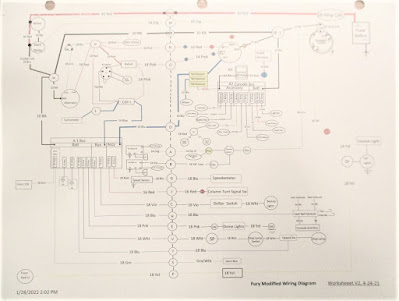
This is an unfinished wiring diagram of all the new circuits merged with original '56 Plymouth and '73 truck circuits, and I still have some things to figure out. One of them is whether or not I should install an additional circuit breaker at the alternator output. If it's clear enough to read, I'm open to suggestions and constructive criticism.  

Thursday, December 30, 2021

Resolution for the New Year


Holidays, repairing broken down household appliances, house painting, unexpected company, unplanned parties, summer-like weather, honey-do projects, plus daily-driver repairs and maintenance all add up to virtually nothing being done on the old Plymouth for nearly two months! Only one more holiday and a couple of social obligations and then I am returning to my long-delayed project come hell or high water.

Between the above-mentioned interruptions, I did manage to find a few minutes to document and organize quite a bit of the resto-mod information in the logbook I started a few weeks ago. Still has to be retyped and photos added, but at least I’ll have something to pass on to my heirs or the next car owner to help un-confuse what they find.

At least you now know that I’m still plodding along, and maybe 2022 will be the year that I can finally get the car moving under its own power again. That will my number one resolution for the new year!

               Good health and Happy New Year to all from sunny and warm North Texas!


Monday, October 18, 2021

Headliner Photos

 Geir, here are a couple of photos of the installed headliner. I'm mostly satisfied with the appearance except for the area I scuffed while trying to install the shell alone. 

I eventually want to have the visors covered with the same headliner material, but they are close enough for now. I have to apologize for the poor coloration in the photos. I guess my cheap camera didn't like the lighting, as neither shade is accurate.


 Two weeks ago I was shocked and totally surprise when I answered the door to find all five of my adult granddaughters, one husband, one fiancĂ©, and best of all, the three-year-old great-granddaughter I had never met! Needless to say, we had a great visit catching up on the past three years that I've been unable to make my usual drive to the Seattle area.


Since our company left, I've been getting our house ready for exterior paint. The paint company is owned by a recently retired Army major, so I got to enjoy another good visit when he came out to bid the job. It's always fun to BS and share memories with others who proudly wore the uniform. 

I have managed to work on the exhaust system for a few hours and have the tailpipe routing and clamping mostly done. It's going to be a tight fit due to the different gas tank and shock routing, but I hope it's close enough so as not to cause problems when I'm ready to fire the engine.  


Sunday, September 26, 2021

9-26-21


It’s long past time to let everyone know that I am still moving and as of yet, have not assumed room temperature!

I’ve been mostly working on wiring, so not much to show in pictures. I’m drafting what I hope will be the final version of the main wiring diagram/schematic to help the next owner see and understand the modifications that were made to the ’56 wiring and how the new additional circuits were added. I’m also visually inspecting wire terminations and making a few routing changes to improve the neatness of the added bundles.

The only other task completed was to install the rear seat and side panels. The fit was very tight and the bench protrudes slightly beyond the front edge of the cross-support. That is the reason the small piece of wood paneling between the console and the cushion. I’ll have to shorten the console a little, or make some type of barrier between the seat and the console panels to protect the vinyl from sharp edges.


Thursday, August 12, 2021

Passenger Door Panel Installation

 Lately, it’s almost like taking a miniature vacation when I can re-purpose a few hours to work on the car and yesterday was one of those days! I was able to get the passenger door trim installed and the latch adjusted.

I still have to play around with the arm rest mounting, but first need to rethink a way to solve a couple of appearance problems.


At least the interior is beginning to look a little less barren. I’ve already fit checked the rear seat and side panels, so once I get them in place I’ll send the door and window handles out to the plating shop.

The new shop air conditioner makes summers more enjoyable in out mid-nineties August temps, so maybe after my wife’s barbecue is history I can re-appropriate a few more household hours to install the rear seats.

Then it will be back to checking for wiring errors! I’ve been putting that off far too long. Doing it without a helper is going to take a long time.


This is the image sent by "unknown" in the comment below. Been there done that, and it works. I remember a neighbor kid back in the mid-50s who bought a $50 Henry J to drive to high school. The interior was trash, so he made a door panel out of quarter-inch fir plywood. He used a wire brush to bring out the grain and give it texture, then stained and varnished it. It actually looked pretty nice, and on a Henry J, there was no way anyone would criticize the results!


This is the part I'm having difficulty finding.


Thursday, July 29, 2021

Small Update

 What was planned to be a two-week period of self-indulgent relaxation concentrating on my car, instead became two weeks of dog sitting and constructing storage shelving for my wife who was away in Belize with several of her artist friends. 

Thanks to the government bureaucracy, after having the dog's airline ticket paid for and all the international  paperwork processed, she couldn't take the dog when three days before she left CDC sent a notice that animals could not return to the USA from certain countries due to a change to anti-rabies regulations. They gave a way to get a temporary waiver, so we e-mailed the form, but just like everything else the government does, they didn't even answer the request until two days after she returned!

Since she returned, I have been able to sneak away for a few hours to resume my delayed Mopar project, and here is where I picked up the job.

After installing the side windows and temporarily hanging the door panel and associated parts, along with the heavy sound insulation, I discovered that I needed to slightly raise the back of the door to compensate for a quarter inch of sag from the additional weight. 

Then I installed replacement poly sheeting on the door interior surface to help prevent rain water from soaking the board and fabric. Following a fit check of the interior trim panel and determining where the panel needed to be cut out to clear the door latch pins, I fabricated a stainless steel trim plate to help the cutout appear more finished.


The black cover for the interior door handle hardware will be covered to match the panel and the homemade handle will be chrome plated. A cushioned arm rest will attach to the top of the cover.

Unfortunately, progress will be further slowed as in a few weeks we will be hosting several of my wife's out of state artist friends to an old fashioned Texas barbecue. Lots of outdoor preparation for me to take care of!

Monday, June 7, 2021

Getting Ready for the Interior

 Still haven't convinced myself to start circuit testing and I'm getting curious to see how the door interior panels fit and look, so I'm trying to get them ready for a fit check. I will have to cut holes to clear the latch pins and install the armrests and handles, so I made a pattern to locate the holes and the panel attaching clips. 

The upholstery shop used 1/8" Masonite for backing panels, which is nearly twice as thick as the original cardboard and it's difficult to install the clips, so I'm hoping to find clips designed for thicker material. If  anyone knows of such a clip, please let me know!


I also decided to reinforce the latch pin. It functions okay, but I'm sure the single layer of sheet metal would take a beating when the door is slammed. The reinforcing plate definitely stiffened the pin and the closing feel is more solid


The forecast is for our three week monsoon season to finally end tomorrow, and if it does there are several days of yard work waiting for me. With water standing everywhere and temperatures expected in the mid-90s F, I'm dreading working outside with the high humidity!

.