Search This Blog

Thursday, December 30, 2021

Resolution for the New Year


Holidays, repairing broken down household appliances, house painting, unexpected company, unplanned parties, summer-like weather, honey-do projects, plus daily-driver repairs and maintenance all add up to virtually nothing being done on the old Plymouth for nearly two months! Only one more holiday and a couple of social obligations and then I am returning to my long-delayed project come hell or high water.

Between the above-mentioned interruptions, I did manage to find a few minutes to document and organize quite a bit of the resto-mod information in the logbook I started a few weeks ago. Still has to be retyped and photos added, but at least I’ll have something to pass on to my heirs or the next car owner to help un-confuse what they find.

At least you now know that I’m still plodding along, and maybe 2022 will be the year that I can finally get the car moving under its own power again. That will my number one resolution for the new year!

               Good health and Happy New Year to all from sunny and warm North Texas!


Monday, October 18, 2021

Headliner Photos

 Geir, here are a couple of photos of the installed headliner. I'm mostly satisfied with the appearance except for the area I scuffed while trying to install the shell alone. 

I eventually want to have the visors covered with the same headliner material, but they are close enough for now. I have to apologize for the poor coloration in the photos. I guess my cheap camera didn't like the lighting, as neither shade is accurate.


 Two weeks ago I was shocked and totally surprise when I answered the door to find all five of my adult granddaughters, one husband, one fiancĂ©, and best of all, the three-year-old great-granddaughter I had never met! Needless to say, we had a great visit catching up on the past three years that I've been unable to make my usual drive to the Seattle area.


Since our company left, I've been getting our house ready for exterior paint. The paint company is owned by a recently retired Army major, so I got to enjoy another good visit when he came out to bid the job. It's always fun to BS and share memories with others who proudly wore the uniform. 

I have managed to work on the exhaust system for a few hours and have the tailpipe routing and clamping mostly done. It's going to be a tight fit due to the different gas tank and shock routing, but I hope it's close enough so as not to cause problems when I'm ready to fire the engine.  


Sunday, September 26, 2021

9-26-21


It’s long past time to let everyone know that I am still moving and as of yet, have not assumed room temperature!

I’ve been mostly working on wiring, so not much to show in pictures. I’m drafting what I hope will be the final version of the main wiring diagram/schematic to help the next owner see and understand the modifications that were made to the ’56 wiring and how the new additional circuits were added. I’m also visually inspecting wire terminations and making a few routing changes to improve the neatness of the added bundles.

The only other task completed was to install the rear seat and side panels. The fit was very tight and the bench protrudes slightly beyond the front edge of the cross-support. That is the reason the small piece of wood paneling between the console and the cushion. I’ll have to shorten the console a little, or make some type of barrier between the seat and the console panels to protect the vinyl from sharp edges.


Thursday, August 12, 2021

Passenger Door Panel Installation

 Lately, it’s almost like taking a miniature vacation when I can re-purpose a few hours to work on the car and yesterday was one of those days! I was able to get the passenger door trim installed and the latch adjusted.

I still have to play around with the arm rest mounting, but first need to rethink a way to solve a couple of appearance problems.


At least the interior is beginning to look a little less barren. I’ve already fit checked the rear seat and side panels, so once I get them in place I’ll send the door and window handles out to the plating shop.

The new shop air conditioner makes summers more enjoyable in out mid-nineties August temps, so maybe after my wife’s barbecue is history I can re-appropriate a few more household hours to install the rear seats.

Then it will be back to checking for wiring errors! I’ve been putting that off far too long. Doing it without a helper is going to take a long time.


This is the image sent by "unknown" in the comment below. Been there done that, and it works. I remember a neighbor kid back in the mid-50s who bought a $50 Henry J to drive to high school. The interior was trash, so he made a door panel out of quarter-inch fir plywood. He used a wire brush to bring out the grain and give it texture, then stained and varnished it. It actually looked pretty nice, and on a Henry J, there was no way anyone would criticize the results!


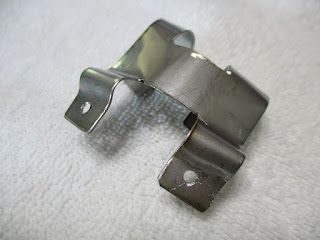
This is the part I'm having difficulty finding.


Thursday, July 29, 2021

Small Update

 What was planned to be a two-week period of self-indulgent relaxation concentrating on my car, instead became two weeks of dog sitting and constructing storage shelving for my wife who was away in Belize with several of her artist friends. 

Thanks to the government bureaucracy, after having the dog's airline ticket paid for and all the international  paperwork processed, she couldn't take the dog when three days before she left CDC sent a notice that animals could not return to the USA from certain countries due to a change to anti-rabies regulations. They gave a way to get a temporary waiver, so we e-mailed the form, but just like everything else the government does, they didn't even answer the request until two days after she returned!

Since she returned, I have been able to sneak away for a few hours to resume my delayed Mopar project, and here is where I picked up the job.

After installing the side windows and temporarily hanging the door panel and associated parts, along with the heavy sound insulation, I discovered that I needed to slightly raise the back of the door to compensate for a quarter inch of sag from the additional weight. 

Then I installed replacement poly sheeting on the door interior surface to help prevent rain water from soaking the board and fabric. Following a fit check of the interior trim panel and determining where the panel needed to be cut out to clear the door latch pins, I fabricated a stainless steel trim plate to help the cutout appear more finished.


The black cover for the interior door handle hardware will be covered to match the panel and the homemade handle will be chrome plated. A cushioned arm rest will attach to the top of the cover.

Unfortunately, progress will be further slowed as in a few weeks we will be hosting several of my wife's out of state artist friends to an old fashioned Texas barbecue. Lots of outdoor preparation for me to take care of!

Monday, June 7, 2021

Getting Ready for the Interior

 Still haven't convinced myself to start circuit testing and I'm getting curious to see how the door interior panels fit and look, so I'm trying to get them ready for a fit check. I will have to cut holes to clear the latch pins and install the armrests and handles, so I made a pattern to locate the holes and the panel attaching clips. 

The upholstery shop used 1/8" Masonite for backing panels, which is nearly twice as thick as the original cardboard and it's difficult to install the clips, so I'm hoping to find clips designed for thicker material. If  anyone knows of such a clip, please let me know!


I also decided to reinforce the latch pin. It functions okay, but I'm sure the single layer of sheet metal would take a beating when the door is slammed. The reinforcing plate definitely stiffened the pin and the closing feel is more solid


The forecast is for our three week monsoon season to finally end tomorrow, and if it does there are several days of yard work waiting for me. With water standing everywhere and temperatures expected in the mid-90s F, I'm dreading working outside with the high humidity!

.

Monday, May 31, 2021

Power Window Installation Part 2

 The next task was where I deviated from the manufacturer's instructions out of necessity, not convenience. 

If the wire bundle was required to fold between the door and the body hinge area, the wires would soon break, so the kit provides a way for the bundle to slide into and out the body when the door is opened and closed. In their version, the bundle is protected by routing it through a flexible extension spring that prevents the wire from sharp bends as it slides into a nylon tube grommet and into the space behind the body hinge area. Their method would probably work fine with a tall, thin door like those on thirties and forties model cars, but by the mid-fifties, the doors had become shorter and curvier, and some structures less roomy so I was unable to  mount the kit hardware according to their plan.

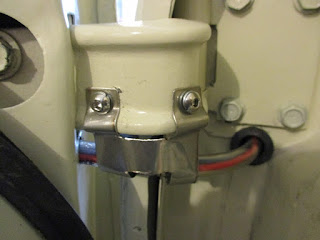
After playing around with different ideas, I decided to see if I could closely duplicate the stock method that Chrysler used in 1956. Once again, I didn't have the stock hardware, nor did I know how it was installed, but Ron Waters sent me a picture on Facebook that showed how and where the bundle was routed using a special bracket to retain, shape and protect the sleeved wires. The design looked simple enough so I tried a couple of configurations and it looked like it would work if I could attach the sleeved bundle to the hinge and align the body and door holes  well enough to allow the bundle to slide. 

I drilled the sheet metal holes successfully but here wasn't enough room for the long nylon grommet inside the body panel so I shortened it about an inch and that seemed to work quite well, but I could see no way to use the spring for protection.  

I then spent a lot of time drilling and tapping threads in the hinges and managed to do so without breaking a tap! The bracket design I made from stainless steel also worked fine with only minor tweaking when installed.


The next task was to route and terminate wires so I could mount the GM style switches in the door panels and lastly, to functional test the switch operation. 


After everything was done, I discovered that I somehow managed to crack the passenger side glass, so now I can undo most of that installation. One step forward and two steps back! Just for kicks, as long as I will have the glass and modified kit frame out, I'll see what can be done to modify and use the stock lower frame for better support. My first guess is that I might be able to get by with the OEM lower frame by cutting off the unneeded appendages and welding two 1/4" studs on the lower channel. I wish I had looked at doing that earlier.    

Everything tested great, so now I've switched my efforts to updating the electrical schematics. 

Tuesday, May 25, 2021

Power Window Installation-Part 1

 The power window kit is installed, wires routed and clamped, circuit powered and switches tested. So far so good!

As mentioned in a previous post, the kit instructions were far more applicable for a '34 Ford coupe than a '56 Plymouth hardtop. That said, I'm certain there are probably more thirty-something hot rods on the road than Forward Look Plymouths, so I'll not complain about the lack of Mopar information. Instead, I will share my experience with my '56 Belvedere 2-door hardtop, and the changes I made to make it a better fit for my situation. Fortunately, Chrysler tends to make most of the brands from the same years similar in design and function, so even if your car is a Chrysler or a DeSoto, you might gain a little info from my project.

The Specialty Power Window kit I installed received high marks from several folks who used it on hot rod projects, and although I found no Mopar projects among the users the function had to be the same, and only the fit required a few changes. This is the only sketch in their installation guide that shows all the components in context. My photo shows all the parts as they come in the kit.


Their instructions are fairly clear in the early steps as they tell how to establish the proper length and cut the tracks to fit your application.

.

Their instructions are less helpful when it comes time to modify the window and attach it to the lift bracket. The Plymouth hardtop lower window frame must be replaced by the kit-supplied channel and since the entire frame is squared and secured by the lower frame, I had to design a substitute method. 

Fortunately I had a piece of 3/8" aluminum channel that fit perfectly inside the rear frame, so I was able to use a simple angle to attach the kit channel to mine with 10-32 screws and nuts. FWIW, I did not use their fabric channel tape since my windows had new tape installed when the glass was replaced.


The method I used is less rigid than the stock Chrysler design, but the way the power window frames move the glass is less stressful than the manual cranks, especially with the light use it will receive. If you intend heavy usage for your windows, I'd suggest the stock parts be modified and welded for more rigidity.


Installing the upper and lower track mounts required cutting sheet metal. The locations don't have to be precise, so I cut the holes where there would be no interference with things to be mounted at a later time. Since I have modified armrest, door handle and window crank locations, your track mounts could be in a different location. Notice the cable from my door handle to the latch and the frame for the armrest and custom inside door handle. There is quite a bit of adjustability built into the kit design, so you have some leeway in where you locate the mounts. After determining the depth of the mounting brackets, I bent them as required and pop-riveted them to the door sheet metal for the top, and to a panel I designed for the bottom. 


I apologize for the formatting, but my layout and the published picture spacing does not agree. I hope I can fix that problem before I post the second part.


Tuesday, April 20, 2021

Back at it


Recovery from our 100-year storm in February has been an expensive and time-consuming exercise, but despite all the cleanup still waiting for me, I actually found a few hours to work on the Plymouth this week.

Since my idea to try different bear claw door latches proved to be a dismal failure, I’ve had to concentrate on improving my original actuator with a simpler, sturdier and hopefully a more reliable design. That step had to be completed before the aftermarket power windows could be installed.

With fingers crossed, I’ll say that the simplified latch actuator operates much crisper and is easier to build and adjust, but as usual, there were a few bugs to work out when it came time to install the glass. I discovered some clearance issues between the latch brackets and the channel when raising and lowering, so everything was pulled out one more time and brackets were re-worked to provide more clearance.

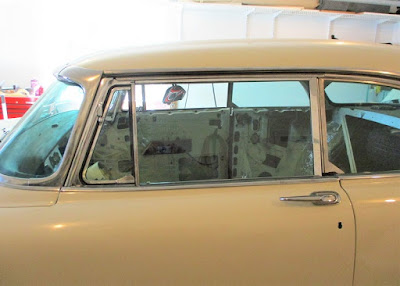
The power window manufacturer clearly designed their kit for the hot rod crowd, and I'm sure they never tried to fit one in a Forward Look car.  I did manage to get the driver’s side window in place and operating, but it required another exercise in creative modifications and tons of patience. I still have some adjustments to make so that the new window fits properly against the rear quarter window seal when the door is closed. I'll do that when the passenger glass is installed so I can adjust both sides at the same time.


If I can talk myself into it, I want to write up a supplement for the manufacturer’s installation manual that might help clear up some vague and fuzzy instructions when working on ’55 and ’56 Mopars. Pictures would have helped me a lot when interpreting their text.

Wednesday, March 10, 2021

Sometimes You're the Windshield, and Sometimes the Bug

 Recently I've felt more like the bug. 

The blizzard and below zero F temperatures a couple of weeks ago have been replaced by almost summerlike 70s and 80s, but problems caused by the weather remain and won't be resolved quickly. So what has that to do with my efforts to get my Plymouth finished? Well, it once again comes down to priorities. 

After the storm, I finally got a repairman to look at my emergency generator and he diagnosed it as a bad controller assembly, but when he checked availability of a new one, he was told it would be at least two weeks before the parts arrived from Generac.  So, I searched the Internet and found a source of OEM parts for $200 less than the repairman estimated and it arrived today. Maybe I can get it swapped tomorrow.

When the daily temperature rose above freezing, I discovered a cracked chlorine dispenser on the pool equipment. Naturally, the part was back ordered, and the distributor said it could be as long as 5 weeks, so it will be another wait!

Nothing else could go wrong, right? Well, when the appliance repairman arrived he decided that he needed another technician to assist in removing the the oven/microwave/warming drawer assembly from the cabinet so he could replace parts. In the meantime he ordered the suspected parts and then left after promising me he would return in a couple of days with a helper. He called a week later and said that everyone was swamped with work and now he doesn't know when he can get back with an assistant. More waiting.

While I wait, I should be mowing the lawn, but was waiting for new spindles to arrive. They just arrived, so I'll take care of that repair this afternoon.

The only thing I've done on the car recently was to evaluate the new bear claw latches, and unfortunately they are not rugged enough to replace the original latches. So, now I'm back to designing a more compact, simple and robust actuator to use with the original  heavier duty latches. I know I can improve my original design by using heavier gauge metal and making the package more compact. I have some ideas, but  will have to find some small bearings before I can begin building a prototype.

It's much like life in the Air Force...hurry up and wait!


Friday, February 19, 2021

Winter Status Report


With the end of the horrible year called 2020, the arrival of 2021 was hailed to be a new beginning, when everything would get better. Well, you can put me on the list as not yet being convinced of that prediction!

 In North Texas, we are used to mid-February signs of spring. Tree buds were swelling, early flowers were beginning to bloom, and resident birds were quarrelling over potential nesting sites and serenading their chosen mate. Even purple martins began arriving from their wintering grounds a week earlier than usual. I guess they believed the claims about global warming and didn’t want to miss out.

Well, as Gomer Pyle used to say,” Surprise! Surprise!”. Weather forecasters last week had been making dire predictions about extreme changes coming soon, and they were dead-on accurate for once. Saint Valentine’s Day arrived with a brisk north wind, plunging temperatures, and snow. That wasn’t really unusual, but the following day winter hit without mercy. By morning it was 9*F, with drifting snow, and by the next day it was a record-breaking -4*F! I had seen +9* a couple of time in my 25 years in Texas, but the last time it had been this cold was in the 1940s.

As an old-timer raised on a prairie farm near the Canadian border, I prepared for winter storms by making sure I had full gas tanks, a freshly filled propane tank, plenty of food, a tank of potable water, and even a propane powered 20kw, whole-house generator. What I wasn’t prepared for was the generator dying before I even got to start it, and then we lost commercial electricity and city water, and my geothermal HVAC began having problems once again!

We experienced rolling blackouts for days, with power-on cycles ranging from one-half to one-hour, and off for an hour or more at a time. The short runs were useless as far as heating since my geothermal HVAC computer requires twenty minutes to boot up to full output! So, we spent days and nights sitting in front of the gas fireplace, but I was thankful I insisted on a gas instead of the wood burning fireplace my wife wanted when we built the house.

Migrating birds suffered the most. A huge flock of Robins emptied the holly bushes of every berry, and then turned to a bag of bird seed I had strewn on the porch. They returned the favor by leaving a bucket-full of dropping for me to clean off.

We sat around the fireplace eating mostly warmups listening to AM radio, and reading real books for the better part of four days, and on two nights we piled on blankets as close to the fireplace as possible.

Yesterday the power came on long enough for the bread machine to finish a baking cycle! Nothing like warm, freshly baked bread in crappy winter weather. Oh, I almost forgot! The oven lower element burned out so I couldn’t have even hand-baked a loaf if the power had stayed on long enough.

So, we were just informed that the mail won’t be delivered for the fifth day in a row, as the big mail truck from Fort Worth can’t get to town. Roads are icy, most gas stations are out of gas, restaurants and grocery stores can’t get deliveries, and the temperatures are flirting with a mild thaw today.

However, this is Texas, so highs in the seventies are expected in a few days.

Today I arranged repair visits for my generator, microwave, and wall mounted oven.

The only good news is that the door latches I ordered last October have been received by the local supplier, and should be delivered sometime next week.


Wednesday, February 3, 2021

Exhaust Fit Check

 Not much showing in the picture, but I temporarily installed the mufflers and tailpipes. So far, so good, They are the stock configuration from Waldron to fit a '56 with the optional Powerpack. Since I have a rear end from a later year  with different shock placement, and a non-stock gas tank, I may have a clearance problem when I take it off the jack stands. At least I can measure and order the proper-sized hangers and clamps. 

One thing that concerns me is how low the pipes will be to the ground where they cross below the transmission mount crossmember. There is room to cut a clearance notch on the driver's side, but because of the driveshaft offset, the other side would require a complicated jog in the exhaust pipe.

I remember my '55 Plymouth when I was a kid had the pipes pass below the crossmember, and I broke two manifolds when the stock configuration pipe hit the ground as the car bottomed out on a rutted country road. I don't drive roads like that anymore, but it would still worry me. Since I plan to temporarily use flex pipe from the manifold to the mufflers, I'll have time to play with ideas.


Tuesday, February 2, 2021

Door Glass Trim Riveting Jig


The door glass is complete and waiting for the latches to arrive so I can verify how much clearance I will have to install the power window hardware.

I gave up on trying to temporarily hold the stainless pieces in place while I riveted them together. It was too difficult to get the rivets tight enough, so I made a simple tool to hold everything together so I could install  the tubular rivets with my little homemade set. 

The metal piece in the picture serves as a backing plate for the rivet and a spacer to secure the stainless in one position. As usual, it took an hour to make the jig, and five minutes to rivet the stainless pieces together. No wonder I've been on this project for more than ten years!


Riveting Jig

Door Glass Assembled


Friday, January 29, 2021

Organization at Last!

 When the weather is too cold and windy to enjoy working in the workshop, my time is usually claimed by my wife for one of her projects. However, this time I decided to take on one of my projects that has been put off far too long. Even though the weather sucks, the sun has been shining enough to heat the upstairs storage area of my garage to a comfortable level 

The long-delayed project has been to build storage racks and to organize boxes of mixed car parts so I don't have to paw through boxes of parts to find what I need. I know there have been many times that I spent far more time looking for something than actually working on the car.

The racks I completed will accommodate about 75% of the large and medium-sized boxes I currently have, and I have three metal storage racks for small boxes. The gabled end will have some wide shelving installed, and several larger parts now sitting on the floor will hang from hooks on the studs.

Island Rack

North Side Rack

About half the sorting has been accomplished and nearly all boxes have been labeled or relabeled after sorting. 

The weather forecast for tomorrow is windy and warm, so I might get something done on the car. I'm getting impatient for the new door latches to arrive so I can install the door glass!


Sunday, January 17, 2021

An ABBA Favorite

Whenever I hear this group, I wonder why we have so much horrible music today. Surely there must be other singers and songwriters in this big world with similar talent! 

Saturday, January 16, 2021

Window Frame Rivets & Window Cranks

 I received the rivets needed to reassemble the door glass. Though I only needed four for each door, the minimum order from Hanson Rivets was $15.00 and they were sold in bags of 100, so they are pretty pricey. To add insult to injury, they charged $21.52 for shipping and handling. Since they were shipped via USPS in a padded paper envelope for $1.00 postage, that seems to be gouging a little more than necessary.

If anyone is in desperate need of these rivets, I’ll give you a few if you send me a stamped, self-addressed envelope.


Another part arrived yesterday. It was a repro button for a Mopar floor shifter. My original worked perfectly fine, but the plastic chrome plating was badly worn. I checked all over online, but the prices were too high to convince me to order. Because of their high prices, I seldom ever check Classic, but this time they were on sale for a little over $40 including S&H. Since others wanted as high as $88 plus S&H, I decided it was time to order. As best I can tell, the quality appears comparable to the original, and I know I couldn’t get the old one re-plated for less than the price of the reproduction part.


Since it was too cold to work on the car in the unheated part of my garage, I did a few small jobs in the heated area.

 I had decided to have the rear pot metal window cranks re-plated so I had to remove the swivel grips and that meant removing the riveted pin. I have always been curious how they were secured inside the handle but was surprised to find that the end of the pin is splined. I might have found a way to pry them out and save the pins but couldn’t think of an easy way to keep from damaging the pot metal parts. I’ll probably make new grips from the same steel tubing I used on the front door handles.