Search This Blog

Tuesday, March 12, 2019

Trunk Equipment Progress

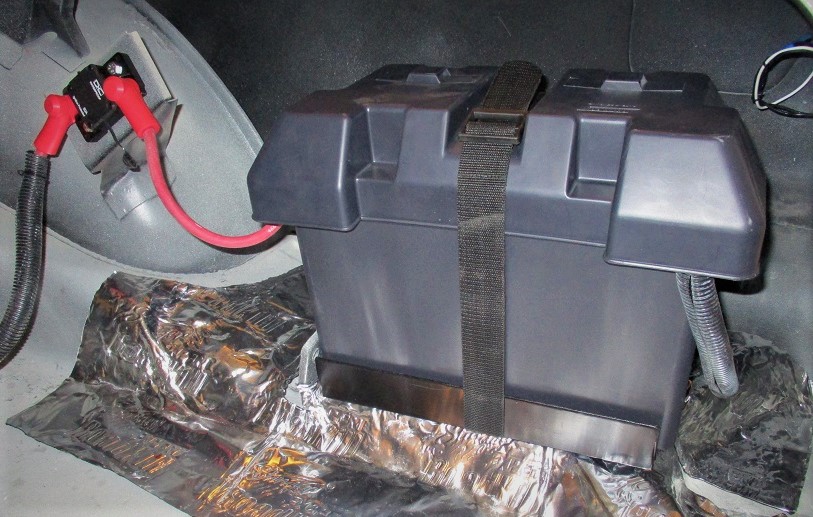
All the trunk-located wire bundles and lights are installed, secured, and tested. The next project was the battery box, and the last two days were spent on that. The main 50 amp circuit breaker is mounted in place, box tie-down bracket fabricated and bolted in place, and the power cable is terminated up to the battery. I'll hold off making the final cable cuts until I can measure the battery terminal locations.

Yes, the tie-down bracket is a little overkill, but I had the angle iron in my stock, so I used what was handy!


I still have to decide exactly where to carry the spare tire, and I don't have it yet so that will be one of my next decisions to make. The logical location, since I no longer have a well to mount it vertically, is the top of the axle hump. It looks like it will fit okay, but I really need the spare and rim to try a fit check so I can design a mounting system. One of the local wrecking yards has quite a few old Mopars, and will probably have a 15" rim on one of the old pickups. I suppose I could fit check with the spare from my '73 D100, but it's quite a bit bigger than the car spare will be, so I'll wait..


Friday, March 1, 2019

Console Bus and Trunk Wire Bundle

The console power bus is complete unless I run into something unforeseen that would require adding a circuit. It came out okay, but as with most wiring, I'd like to have the time to make it neater. Fortunately, it will be hidden from view behind the console storage box.


The flexible metal tabs that support the trunk wire bundles were all rusted off, so I was about to buy some cable tie mounts so tie straps could be used to secure the bundle. But, being frugal whenever possible, I tried creating something functionally similar to the OEM design. The stock tabs were made of very soft and flexible metal and spot welded on, so I couldn't duplicate that. Since I had a bucket full of sheet metal scraps, I tried using the remnants from the metal cutting process. I formed short pieces to lay against the sheet metal and bonded them in place with 5-minute epoxy.

This is one of the cutting scraps and a part I formed from it. They bend easily, and though they might become work-hardened faster than the stock parts, they should outlast me and the rest of the car.


The next shows them epoxied in place and securing the wire bundle in place along the trunk opening. Again, it's not pretty, but seems to doing the job quiet well, and it's not glaringly visible.

Wednesday, February 27, 2019

Light 'em Up!

I got all the rear light wire bundles routed and connected and the circuit tested. With everything new or polished and cleaned and with power applied the taillights, license light, and backup lights all look nice and bright. Just one more completed task that promotes enthusiasm! 

Now we have to endure yet another cold, wet week before it warms up enough to take on the next phase, which will likely be installing the battery box and main circuit breaker. 

I also have to create a way to mount a spare tire atop the axle housing shelf. 

Then, temperatures permitting, I think I spend some time under the car to hook up the kickdown cable, and figure out how to rout and mount the emergency brake cables. 


Friday, February 22, 2019

More Little Things

Winter’s return and two shop-warming tanks of propane later, I’ve accomplished a few things, but not much visual progress.
I’ve shifted some of my focus to getting all the connecting parts for the radio/GPS/camera installed. I bought a camera from Car Toys that had the cables included, and now have them routed.  I’ll be anxious to see if the inexpensive backup camera works, but that will have to wait until I continuity-test all the wiring. This camera is designed to be installed through a ¾” diameter hole in the tail panel. I would have liked a better-quality camera, but they all mounted on the license plate frame.
I also bought a radio antenna to modify and try out with a homemade mount for the top of the tailfin. If it works and looks okay, I’ll get a second one to use as a dummy on the other side. I don’t know why I want to mess with dual antennas, but it somehow seems more correct for this car. Maybe I’ll change my mind if the homemade mount is too difficult to cast. It’s one of the features I’d like to have, but I’m not going to go overboard and waste time like I did trying make the pushbutton shifter work.
I couldn’t find any fin-mount NOS antennas online, and the last ones I saw must have been gold plated as they were well out of my price range. To make the generic antenna fit, I’ll have to make a mold of the fin and then cast a new base from resin, but that project will have to wait for warmer weather.
Most of yesterday was spent installing the Bouchillon throttle linkage, and I discovered that it will require a modification of the suspended accelerator pedal mount. Because of the curvature of the firewall at the exact point the cable has to enter, the cable would be tilted and subject to excessive wear, so I’ll have to come up with a bracket to hold the cable perpendicular to the cable angle. Yet another unexpected opportunity!


I decided to place the USB port inside the ash tray instead of the glove box as originally intended, since it won’t be needed for the intended purpose. 
The glove box redesign is also complete and fit-checks okay. It won’t be installed until the electrical circuits behind the dash are tested.


Monday, February 4, 2019

Sneak Peek


If an 81-degree day arrives in February, it’s important to take time and smell the roses! To heck with my shelf-building plans and all the yard projects awaiting nice weather!

After working up an honest sweat on the treadmill, I had a productive morning finishing the console wiring. Then I decided to loosely assemble all the pieces I have ready for the dash and console. Nothing is fastened together, but it was fun getting a glimpse of what it will look like eventually. Purists will curse and  groan, but so far, I’m satisfied with the way my ideas are coming together. I think it still looks period-similar, but everything is new or rebuilt with modern functioning parts.

The only wire bundles yet to route and tie are from the console to the tail lights, and I need to order more clamps and protective sleeving before I can finish that.

Winter Dance Party-60 years later


February 4th, 1959, the day the music died, and now it's just one more anniversary in my glacier-like mission to rescue a '56 Plymouth from the rust monsters. Sometimes I think I see progress, and at other times I wonder if I can keep moving fast enough to stay ahead of them.

I took a short break from wiring and turned to making a few sheet metal pieces. Rear speaker adapter plates, stainless trim to join the front part of the console to the dashboard, and now I'm making a custom-shaped glovebox that will clear the AC and radio and give me a place to mount a USB port out of sight.

The weather has turned spring-like, with temps in the seventies, and today will be a struggle to decide if I can keep working on fun car stuff, or if I have to haul the table saw outside to finish the shelving for my wife's art studio! Looks like several days of rain showers coming up, so my conscience is conflicted.


Monday, January 28, 2019

Dash Wiring in Place

The wire bundles behind the dash are terminated and installed out of sight. The only bundles remaining are in the area where the console circuits and tach panel join.

Before I can consider the main wiring complete, I have to conduct a manual continuity and shorts test and that will be a tedious job working alone! I'm also waiting for the park lights I ordered and still have to hook up the tail lights, turn signals and backup lights. All the little wire clips around the trunk were rotted off, so I'll have to find some self-adhesive clamps to replace them

I think I'll take on a few mechanical tasks while waiting for my remaining electrical parts to arrive. All the linkages have to be designed and fabricated and also the emergency brake cables. No shortage of things to do, but at least some progress is visible!

Monday, January 21, 2019

New Plaything


My DIY wheel alignment tool arrived and while it looks reasonably simple to assemble and operate, the website for the video location is incorrect, so for now all I can do is look at the shiny new toys. Everything looks high quality, so I hope looks aren't deceiving.

Their brief instruction sheet makes it clear they want you to first visit the instruction website and watch the video, but the only video I can find about the tool is a brief description of the alignment method on youtube, not details of how to assemble the little loose parts and set up. 

Maybe by the time the weather warms up enough to crawl around on cold, concrete floors the website info will be corrected. In the meantime I have plenty of other things to do.


I did get a start on connecting the dash bundle to the firewall connector, but the first thing found was a wiring error, and of course I now have to track down a splice hidden in a mass of wires that I can hardly see.  Situation normal! 


Friday, January 18, 2019

Progress!

A few pieces that had been taking up shelf space for months are finally finding a home. The dash is in place and the next job will be hooking up the mating wires behind the dash while standing on my head, but at least the progress is becoming visible.

Too bad the weather makes a big change tonight. It was comfortably warm and breezy today, but a cold front moves in tonight with near freezing temps and 40 mph NW winds. Guess I'll spend a couple of days cleaning up the new wiring diagrams until the weather gets better again.


One thing I've been putting off is finalizing the rear shock mounting. I used the stock 1970 B-body shock plate, and I'm concerned about the length and angle of the installation. I no longer have the OEM setup to measure, so once again I'm flying blind, but I think the shock length could become a problem. If anyone has made a similar rear end swap, I'd like to see a picture of what you did, or hear comments and opinions. Did you use longer shocks, or make a custom mount, or did the later shock plate work out okay?


Tuesday, January 15, 2019

Almost Back to Normal


The wife and dog returned from their Las Vegas trip, so things are starting to get back to normal. More projects on her list, but I'm still glad to have them back.

Normal also means I have unexpected problems to eat up my free time. My computer decided to act up again, so I've been haunting HP tech support. Last year, my months-old HP Envy desktop breathed it's last. Tech support decided it was a hardware problem and wanted me to send it to the HP repair facility under warranty but the time to fix would be a month or more. I wasn't about to wait that long, so I visited the Best Buy Geek Squad for an estimate. They quoted $200 to troubleshoot, but suspected the mother board needed to be replaced. That would be another $350 and about two weeks to get the board! That was within a couple hundred dollars of getting a new computer, so naturally, being old and stupid...and since I had an almost new monitor, a new tower was the way to go. I bought the same model with the idea that I could cannibalize parts and have extra memory cards to upgrade. Now, eight months later, the new computer is giving me fits and tech support is stumped again. The worse part is they suspect another mother board. I know that if they want me to send it out again, I've bought my last HP computer! I've had Gateways since '92 and never had one go bad.

My dear wife has lots of projects for me to work on, but I put them aside so I could spend time on the car while the weather cooperated, but that only lasted two days before winter returned.

 At least all the console wiring is routed and tied into place, and I'm incorporating a few changes into the dash bundle. When the next nice day arrives, I'll try to get the dash installed.
Before I install any more sheet metal on the front, I'll have to make some rough alignment tweaks while all the adjustment points are readily accessible. Instead of taking a wild-ass guess with a level and a tape measure, at the recommendation of a Forward Look member, I ordered a simple tool that claims to measure all the adjustments.from one setup. It should arrive within a week, so we will see if their claims are truth or the usual BS! At least it's US made.