Search This Blog

Tuesday, December 27, 2016

A Taste of Spring


While my old home town is mired in winter and paralyzed by record snowfall and blizzard conditions, it was short-sleeve weather here…sunny, light breeze from the SW, and 70F. What a perfect day to work on the car!

I had to do some shopping this morning, so I couldn't get a full day in in the workshop, but I did finish making an adapter and installing the transmission mount. The adapter worked okay so I didn’t have to modify the cross-member, though I did have to slightly modify the mount itself. If anyone has to replace the mount and sees the modification, they might have some choice words for me, but I’ll be long gone by the time it wears out so I don’t care!

I was also able to dispense with my doctor-prescribed cardio exercise, as I worked up a real sweat crawling under and climbing out from under the car a couple of dozen times. I’m sure my muscles will remind me that I got far more exercise doing that than I would have walking a couple of miles on the treadmill.

Unfortunately, all did not go well when I made another attempt to install the stainless trim above the back window. The problem that plagued the glass installer is also causing my grief, and I can’t think of an easy fix. I can’t even think of a difficult fix!   I do know there is no way I can accomplish it alone, and I’m going to have to design and make a tool to tuck the rubber inside the trim, no matter how much help I have. I’ve researched commercial glass installing tools, but so far I haven’t found one that looks like it will do the job.

After two hours of frustration, I dug deep into my memory banks for some long-unused cuss words, repeated them a few times, picked up my tools and locked the shop. I definitely need some serious think-time before I try it again.                                                                                                                                                                                                                                                                                                                                                 

Sunday, December 25, 2016

Saturday, December 24, 2016

Sill Plates from Santa


Santa did it again, but this Christmas he was driving a UPS truck instead of a sleigh!
The sill plates I ordered a couple of months ago were sitting by the front door when I got home this afternoon. Naturally I put aside the household chores I had planned so I could check out the new parts.
First impression was that they were packaged to be safe from that one uncaring gorilla that seems to work for every delivery service. They were individually wrapped and sealed in heavy poly-plastic, then inserted into a close fit plastic tube, and finally placed inside a snug fitting cardboard box.

After assuring that they were undamaged, I dug out an old plate so I could take pictures of the two together and report on the fitment and quality.
First, the concourse restorer would have some issues, but I have none at all. The most apparent difference is that the originals were stamped and these are machined, so the Plymouth name is milled slightly below the surface, while the original is slightly raised. The same is true of a couple of other areas around the engraved lines, and also the welt notches.
The mounting-hole locations are a perfect match, as are all the engraved lines. The external dimensions are also exactly the same. The only dimensional differences are the inner corners that are cut at 90*on the new parts, while my originals are rounded.
The short ends are also bent down on the OEM part, while the new ones are not. It would take a stamping process to make that bend without the corner looking a mess, so that is understandable.

The finish is beautifully smooth, without any scuff marks or nicks. I don’t know if either the OEM or the new parts are/were anodized.

Overall, I’m very happy with the parts, especially since the price was right. I originally ordered one set, but called back a few days later and asked if they could add another set to my order. They did, and even discounted the second set.
Once my car is on the road, I might put that second set up for sale, along with all the leftover parts from the Fury.

Christmas Eve


Whether or not the season holds religious significance to you, it’s a magical time that promotes good will between most of us who share this earth. In spite of over-commercialization and hectic schedules, there is an underlying feeling of peace that prevails, and I have only good memories.
As a child in North Dakota we could expect snowy and cold weather every Christmas. On Christmas Eve, two extended families would gather at our paternal grandparent’s farm house, built on the land my grandmother homesteaded as a nineteen-year-old Norwegian immigrant at the turn of the last century.  She always prepared a traditional meal that was half-American and half Norwegian, and the best of both cultures. Real candles in metal holders decorated the small fir Christmas tree, and were only lit when it was time to open the mountain of gifts that threatened to overwhelm the tree. Most of the colored wrappers contained inexpensive toys and practical clothing, but my favorite gift was always the one from my grandparents…and it was the same every year…a carton of Winchester Super X .22 long rifle cartridges wrapped in a pair of wool socks.
While in the Air Force, Christmases were spent in the blockhouse at our missile site in Germany. We single airmen volunteered to work on Christmas and Hanukah so the married guys could celebrate special holidays with their families, and the favor was always returned in some way. Those little gifts of time were so important to the camaraderie that binds the military.
On Christmas Eve, there was almost no live programming on either the Armed Forces Network, or German radio, and as today it was mostly pre-recorded Christmas music. Winter in the ancient Hunsruck mountains is snow, snow, and more snow, and in my mind I can still see the huge flakes drifting slowly downward, covering the missiles and ground support equipment. Later we would have to sweep and de-ice the missiles, but for the moment the heavy snow muffled every sound and for a short time it did indeed become a “Stille Nacht, Heilige Nacht”.
This Vienna Boys Choir version of that old song seemed to be the favorite of everyone in the German speaking countries, and it’s beautiful in any language. Merry Christmas Everyone!


Thursday, December 22, 2016

Please Come Home For Christmas


As long as I'm still busy taking care of Christmas things and not working on cars, I'll just promote another local talent who has done quite well for herself.

Tuesday, December 20, 2016

1956 AUTO TRANSISTOR RADIO COMMERCIAL


How far we've come! Seeing the parts from an old tube radio sure conjure up nostalgic thoughts. I remember tube testers in hardware stores, drug stores, appliance stores, service stations, but especially the one in my grandparents general store in a tiny North Dakota town. I couldn't begin to count the number of times I pulled the radio from one of my cars, put the tubes in a paper sack and took them to my uncle to be tested. He was a self-taught radio and TV repairman who worked in a little nook in the back of the store, and he was always busy keeping the old tubes glowing for his customers. Visiting with him while he worked on a radio, listening to the hum of a vibrator and smelling the distinctive odor of hot tubes are memories I'll never forget.

I almost feel bad replacing the original with the modern version, but my old, arthritic neck will appreciate the backup camera, and I've learned to love GPS navigation.


Saturday, December 17, 2016

Quarter Window Temporary Install

Before making a decision about the roof rail gasket, I decided to install one quarter window and check fit the upper trim channel.

Nothing has been adjusted or tightened, but It looks as if it will work. The window cranks up and down and follows the track fine, and the potential bind between the glass frame and the upper channel doesn't seem to be a problem, at least with everything loose.


Here's a picture of the cat whiskers pre-bent to install in the other channel. It's a slow process to keep it from kinking, but at least it bends enough to fit. It would have been nice to find a way to un-crimp the moulding and make it like the original, but this way works too.


The temperature has dropped 29 degrees since my earlier post, so it's time to close the shop before I have to start the heater.

Roof Rail Gasket

Does anyone recall, or know where there is a picture of the roof rail gasket installation. Nothing in the service manual shows it.

The shape is such that it really doesn't fit well any way it's positioned, and the only part of the shape that looks like it might be meant to match is the curved side. It about fits the stainless channel trim, but if installed that way, the inside edge falls very close to the screw holes. If flipped, the curve doesn't match the nearly 90* bend in the metal, but the holes are centered on the rubber. Maybe it's designed to wedge against the tight angle so it seals better, but nothing looks right either way I put it.


Not helping matters is the fact that both the Belvedere and Fury parts car had what looks like white bathtub calk instead of a gasket. The way the stainless channel trim and headliner meet in that area looks like it could easily develop leaks, and I'm guessing that's why both cars appear to have been repaired with sealer.  I suppose I could also go that route, but since I already bought the parts I'd prefer to assemble everything as originally built.

We're expecting what locals refer to as a "Blue Norther" to hit this afternoon. The temperature now is about 70F at 11AM, but by sunset it's forecast to be freezing, and in the low teens by morning, with strong NW winds. I made a big pot of vegetable soup the other day, so I think I'll hibernate for a couple of days.

Wednesday, December 14, 2016

Comments, email, and other frustrations

I wish I better understood the world of computers and the Internet, but this old dog has a hard time learning new tricks. Either that, or someone is plotting against me.

For some reason, my settings page is no longer alerting me when comments are received, so several have been awaiting moderation and publication. I only reject those that are spam, and have never blocked one sent by a reader. This morning I finally found that "dead letter office" containing the comments I had never seen. I apologize for that, and will make a point of checking the site more often.

Email is another issue that has me scratching my head. I received an email from a reader and replied, but it was refused as undeliverable. I had simply used reply, and didn't make any changes to the address, so have no idea why it was rejected!

Two weeks ago, I sent two forms in separate messages to my wife's public email address, but only one made it to her. The other has been sitting in my outbox and will not send, so I sent another copy and it went right through. Go figure! Of course, that doesn't compare to what happened about a year ago. I had received complaints that I wasn't responding to emails that I swore had never been received. They seemed to have disappeared in cyberspace. Then one day I received 35 emails at one time. Some had been sent up to six months earlier and were from different people...some who mail often. Where had they been sitting for those many months? Why did they arrive in one group? No one has offered a reasonable explanation so far.

Computer software and hardware keep changing at a pace I can't keep up with. Everything is faster, does more, and looks prettier, but something as basic as email remains problematic for decades. Ditto for setting up Internet connections. Other programs, like Quicken are full of new and amazing tricks, but the same old reliability problems remain, and user friendliness suffers.

Still not feeling well this morning, so I'll be spending more time on the couch with a book than under the car.

Tuesday, December 13, 2016

Quarter Window Progress


I received the cat whiskers that will be used on the upper stainless steel quarter window channel.  It’s a decent fit and at least it bends to follow the curvature of the glass, unlike the material used on the straight pieces.  I couldn’t find an easy and inexpensive way to straighten the OEM clinches in stainless that secured the original material, so these are glued in place. Since longevity under service won’t be an issue, I trust it will work. The only thing that concerns me is the fuzz is a little bit heavier than stock and the .5” thick window frame might fit tighter than desired until it breaks in.


If anyone is interested, the part number of the bendable channel I got from Restoration Specialties is: M141P-96-WIN
$26 per 8ft length, and because of the long package, freight was $35.
As usual, parts never expected to cause a problem do. The quarter window lower adjusting mechanism showed almost no rust, just a dusting of white corrosion, but some of the special locking-type adjustment screws are immovable. I soaked and scrubbed them with lacquer thinner, followed by brake cleaner, and then hit the threads with PB Blaster. After several applications and soaking for two days, two of them broke free, but others are still frozen.  They can soak a couple more before I need them, but I might have to resort to a Vice Grip and replace with some from the parts car…if they can be removed!

I couldn't get a good picture of the cat whisker channel installed, but this sort of shows the black bead fitting against the edge of the stainless.


Got a call from the door sill folks to request final payment. She said they are ahead of schedule and will be done in about two weeks. If their reputation is accurate, they will probably be the best reproduction parts I put on the old Plymouth.
I've been sort of under the weather and haven't felt like crawling on cold concrete, but If I feel better tomorrow, I'll to get the transmission mount attached.

Thursday, December 8, 2016

Winter

Winter arrived and there is not much going on with the car. Between household chores and trying to resolve the renter issue, I've only had time to sneak in a small job now and then.

Just as I feared when trying determine where to locate the cross-member without having an assembled engine and transmission to measure,  the location of the transmission mount was far enough off to require a simple plate adapter. I got it made and am only waiting for paint to dry so it can be installed and the mount bolted in place. Then I can begin work on the shifter installation.

For what it's worth,  this blog has recently experienced heavy traffic from Russia. There have always been a few Russian visits, but in the past few days there have been more than twice as many hits as from the US and Canada combined! I really doubt there are that many Forward Look fans in Russia, so I'm curious if it's a bot searching for something interesting to hack. There are always a few random visits from France, Belgium, Spain, Portugal, Ukraine, India, and Pakistan, in addition to the usually predictable ones from the Scandinavian countries and North America. However, the sudden increase in Russian traffic makes me wonder if perhaps Siberia is snowed in and all they have to do is read blogs!


Sunday, December 4, 2016

Another Surprise!

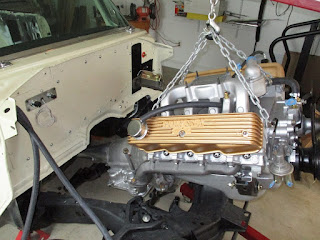
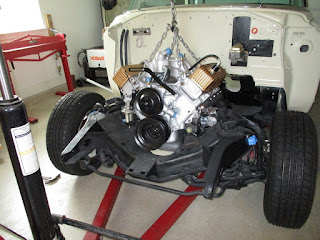
I decided to see if I could get the engine installed before I'm immersed in the eviction problem. This was another job that would have been much easier with a second set of eyes and hands, but I did manage to set the engine in place and the front mounts fit great. I do have a problem with the transmission mount, but working that issue will have to wait a few days.


When the belt mouldings I ordered arrive, I'll be switching back to the quarter window install mode.  At least now it looks like progress has been made, and there is much more room in the shop.

Saturday, December 3, 2016

A Few Small things...plus Marty Robbins


Not much to photograph, but a few little things completed. I spent a couple of hours installing cat whiskers on all the stainless steel pieces that surround the quarter windows, but had to order a different style for the upper window channels.
I finished fabricating the new plastic guides that protect the fuzzy surfaces on the lower quarter window frames when operating the windows. I used Lexan, so these should last much longer than I will! The material was about a half-inch shorter than the original part, but I wasn’t  about to order more Lexan, and they look like they will work fine.


I finally installed the last brake parts and made some suspension and steering adjustments that I’ve been putting off.
The new mini-starter I ordered arrived today, so I’m about ready to see if the engine and transmission will fit. Unfortunately, I doubt I’ll have time to do that this week, as I have the unenviable task of evicting the people who were buying our house in East Texas.  We were going to finance their purchase for five years so they could build up their credit, but in two years they are already four months behind in payments and have let the house and landscape deteriorate badly. Seems like every time we do someone a favor, it backfires. Merry Christmas to them….
On a happier note, here's Mopar racer Marty Robbins with an old Roy Orbison Christmas hit. Big surprise to learn that the song was written by Willie Nelson.

Monday, November 28, 2016

Full of Turkey and Back to Work


Our Thanksgiving company has gone home, so I had a chance to work on a few things yesterday.
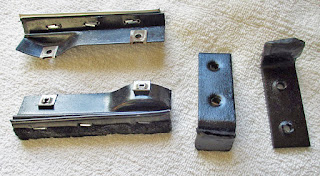
I de-rusted, painted and padded the two styles of brackets that help guide and rattle-proof the quarter window movement when it’s in the open position. The shorter leg of the L-shaped brackets was padded from the factory with some type of rubber material that looked like the same thing that is sold to dip-coat tool handles. I didn’t have any of that product handy, so I substituted gasket making material which should do the job. I know it won’t come off without being cut off, as I discovered trying to clean up some minor spillage that had dried.

Next I installed the track that guides the quarter windows when raised and lowered. This proved difficult as the lower end of the track fits deep into the corner where the sheet metal, floor panel, and inner rocker panels intersect. Due to the extreme rust in that area during repair, it was impossible to get accurate ,measurements to perfectly fit those pieces together, so the track is jammed pretty hard into the corner. I should have caught that during disassembly. I don’t foresee it creating a problem with the window installation, but I’m keeping my fingers crossed.
Once I got the torque converter to seat it didn’t take long to get the transmission mounted, but I ran into another unusual situation. The mounting bracket for the dipstick tube didn’t fit properly, and had to be re-bent quite a lot! I somehow missed taking a photo of the dipstick area during disassembly, so I have no idea what happened.  

I bought the engine and transmission still bolted together and I was the one who tore down everything, so have no one else to blame. Where is a good scapegoat when I need one??
I’ll try to get the engine and transmission installed this week, but I think I’ll pick up a lightweight starter first to make sure there are no fit issues with it.

Thursday, November 24, 2016

Happy Thanksgiving Day


I've always been an individualist, and among my high school friends I was the only one who drove a Plymouth. I was constantly teased about driving a "Mayflower", so my stubbornness to be different has resulted in at least one Plymouth in my driveway continually since 1955. It seems appropriate that I remind everyone that the Plymouth name was borrowed from the Plymouth  Colony, and the symbol from the Mayflower, the ship that carried the pilgrims to the shores of Massachusetts from England in 1621.

Besides the more serious thankfulness I feel on this day, one small thanks is for being able to finally get the torque converter to drop into place!


Sunday, November 20, 2016

Still Having Problems Without Answers


Installing the last piece of stainless trim around the rear window is becoming annoying to say the least. I pulled the equivalent piece from the parts car, and it’s a perfect match for the one giving me fits. That led me to investigate the rubber seal that earlier caused problems for the installer, and I believe it’s the culprit again.
When compared to the old seal on the parts car, there are differences, including profile measurements that might contribute to a poor fit. As I mentioned in an earlier post, the edge of the trim nearest the glass is designed to slip into a groove in the rubber, but there are dimensional differences between new and old. Some deviances in shape can certainly be attributed to time and weather affecting the old one in the parts car, but the depth and width of the groove that concern this trim should be about the same, yet they are substantially different. The slot in the old one has a depth of .26, while the new Steele rubber measures .18. The internal width of the old piece is .10, and the new is not really measurable,  but my guesstimate is about .05. The way it is shaped now, instead of slipping all the way into the groove, the trim edge bottoms out so the rubber puts pressure on the trim and prevents it from slipping into the proper position. I tried taking pictures, but they didn’t show enough detail.

Meanwhile, I’ve put small wedges in the slot and I’ll leave them for a few days to see if they will help form the rubber to make the trim slip in easier.
I feel guilty complaining about the quality of the seal, since Steele is one of the few companies making restoration parts for our cars and kudos to them. This is really the only part from them that has ever given me fit issues. Usually they are equal to, or better fitting than aged NOS parts. Maybe it’s just me, or maybe it’s the uniformity of cars from that era, but it definitely is frustrating.
Not to be outdone in the annoyance department is the torque converter. While waiting for the rubber seal to adjust, I decided to mate the engine and transmission, but so far that hasn’t worked out too well either.
Many years ago, a Mopar friend who owned a transmission shop told me the easy way to mate the TC to an aluminum TorqueFlite was to stand the transmission on the tail shaft and spin the converter a few times until it drops into the proper position. That has always worked well for me in the past so I never felt a need to locate a factory alignment tool, but not this time! Usually a half-dozen spins does the trick, but this time I spun that damn converter until my fingers were raw and it still didn’t drop! I finally decided to call it a day before I resorted to non-productive cursing.
With lots to do before company arrives for Thanksgiving, I doubt I’ll have much time to get back to my latest re-build frustrations until sometime next weekend.

Tuesday, November 15, 2016

Dog Days

One more piece of trim to install on the rear window, and it's proving difficult. Unlike the windshield that's secured by fasteners all around, the lower edge of the rear window upper moulding must fit in a slot in the gasket. Then the ends of both the top and bottom moulding are held in place by the pillar side plate. The problem I'm having is getting one end to stay in the slot, and it appears that the moulding is deformed. I'm beginning to think I got it too hot when polishing and that the thin stainless warped. As I'm getting tired of fighting it, I think I'm going to remove the same piece from my parts car, carefully polish it, and see if it's a better fit.

Meanwhile, it was a beautiful, warm day, so I relegated the car to the back burner and decided to give the big dog a bath. The two Maltese go to the groomer and get bathed in the sink between grooming, but Bonnie, the Shar Pei, gets her bath outdoors. With much colder weather due to arrive Saturday, I thought it best to rid her of the doggie smell while the air was warm. I know, giving one dog a bath doesn't sound like a big deal, but the catch, wrestle and hold experience gives me all the exercise I need for one day! Anyway, she now smells like shampoo and I think has forgiven me for the torturous experience. Unfortunately, now I'll have to smell that Johnson's Baby Shampoo from the foot of the bed for several days...but I guess it's better than doggie odor. I really have to find some mild, unscented shampoo to use on her.           
It was also a good day to take the Valiant out for a spin, as I'll probably put the top up tomorrow so it can sit in the sun while the vinyl top un-wrinkles from being stored in the well since March.

Thursday, November 10, 2016

Windshield Trim

I finished installing the windshield trim, but there were unresolvable issues. They really don't affect my needs, but I can see someone doing a precise restoration tearing their hair out.

Every piece of trim around the windshield is meant to slide into a groove in the rubber seal, but only the lower pieces fit anywhere where they need to be. The top is off by 1/4", and the side mouldings are off by as much as 3/8" in places...far more than can be tweaked to fit. I'm not sure if it's the seal shape, or if the body tolerance is off that much. Now I wish I had taken more close-up pictures of the moulding installations before I began to disassemble the car. Oh, well!


Time to order the rest of the rubber parts I need from Gary Goers, so I worked on a list today. Most items I still need are for side glass installation. When the order is sent off, I next have to replace the Chinese made grease seals on the tie rods, and install a couple of front brake parts. Then I can install the engine and transmission, and it will really look like I'm making progress!

Wednesday, November 9, 2016

Extra Holes Update

Worked a little more on trim installation, but before I did I removed a piece of stainless from the parts car, and found that the questionable A-pillar holes in my car do not exist on the Fury. It appears that there were indeed holes at one time, but that they had been welded shut. The parts car had been painted red over the stock color, and then at some point changed to black, but under the stainless trim the welds were still covered by the original Fury white. That makes me think the holes existed in the original cowling tooling, but were then filled with weld before the car was painted.

However, though it's not shown in the service manual picture, the center hole does exist, and there is some type of fastener in that location on the parts car. I didn't attempt to remove that trim as there is no way to access the nut without removing the heater box housing, and I didn't feel like doing that.

I believe the windshield could be replaced without removing that one piece of trim, and may be the reason it's not addressed in the service manual.

I used only two clips to secure the center trim, and filled the cowl hole with sealer. The other two holes will get the same treatment.

Bolting-on the Bling

Busy day, but I was able to spend a couple of hours mounting stainless trim. Mostly, it went well, but I did run into an odd situation on the windshield trim.


When I stripped the car several years ago, I didn't notice that three holes are inaccessible to install nuts on the mounting clips. I don't recall any unused holes, but then it's been a long time. One location on each side near the A-pillar can't be reached with the dash top installed. To make it even more strange, on the driver's side the hole is mostly covered by one of the stainless pieces, so a screw wouldn't fit properly even if it could be reached from inside. The service manual shows the mounting points near the vent location, but it does not indicate that there are others at the A-pillar locations. Makes me wonder if they were just left open. I didn't find any notes that might shed light on the situation. For what it's worth, the A-pillar side trim doesn't fit well and it determines where the top and bottom pieces are located. That contributes to the partially covered holes, but there is no way they can be adjusted. It appears to be a tolerance issue during the original assembly.

I think the A-pillar holes are located where water might not enter the interior, but I can't clearly visualize the path it would take. That might also be the case for the center clip as it appears that it would drain somewhere inside the fresh air plenum. When the rain stops, I'll crawl inside the donor car to see if I can verify what I suspect.

Here's a picture of the different way I chose to mount the trim.


Instead of the original flat plate with a welded-on stud, I'm using a universal spring clip with a stud. The clip on the left shows how the spring must be re-bent to fit the narrow stainless piece. In place of the black sealant used in the stock method, I'm installing washers made from .125 thick neoprene stock. I punched the center hole smaller than the 10-24 threads so it sort of screws on the stud to seal better. It's far less messy than the stock goop, and it should seal adequately in most locations. Since I have no intention of driving for hours in rainy weather, the only leakage I have to worry about is when the car is washed, so it should be fine.

Thursday, November 3, 2016

And There was Glass!


Thanks to a link provided by Forward Look friend, Marc, I called Extreme Auto Glass Pros in Dallas, and unlike the smaller local auto glass shops, they said that they do install owner provided glass in classic cars. Bob, the technician they sent out, had 37 years of auto glass experience so had done hundreds of older cars. However, to underscore the rarity of finned Mopars in the world, and despite his considerable experience, this was the first ’56 Plymouth he had ever worked on. Fortunately, automotive designs from the same era are similar in concept so after a quick glance at the service manual, he jumped right in.


When I had attempted to install the back glass, I had problems that I attributed to my lack of experience, but Bob immediately ran into the same problem. He asked if the glass was the same one I removed, as it was too small to fit properly in the opening.  I assured him it was, but for the seal to center and secure the glass, he had to shim the lower slot nearly 1/8”. When I removed the old seal, I didn’t notice anything unusual, so perhaps the Steele branded seal isn’t the exact same profile as the original. I’d be interested to hear if others have experienced the same issue.
At this point, the major problem I foresee is the potential for leaks, since it doesn’t fit snuggly. Although the car won’t be driven in rainstorms, that’s not really an issue, but just washing the car could allow water into the trunk.  

The windshield was a ten minute job, as everything fit perfectly.

Inspired by the look of glass in place, I began to lay out the stainless trim. I quickly learned that I should have noted the removal sequence, as it does make a difference which pieces go on first, but I think I have that mostly figured out.
Because of the way the trim is secured by thin slots in the seal, there will be quite a bit of manipulation required to make them fit, so like everything else, that part of the installation will take longer than expected. Also like everything else, I’ll have to make another trip to Fastenal to pick up some #10 rust-resistant nuts and washers. Good news was that the universal moulding fasteners I bought from Rock Auto work great after I re-formed the tension spring so they fit the narrow, ½” moulding.

One interesting tidbit I learned from Bob was that their shop does the glass work for the TV reality series, Gas Monkey Garage, so he’s been involved in some interesting projects.

Bob also took a picture of the photo-shopped version of my car, and if the picture of a picture looks clear enough they will post it in their website album.

I’m slightly disappointed that I wasn’t able to do the glass job all by myself, but I’m glad it’s done so I can get back to serious assembly. The glass installation was $350, so the total cost came to roughly $1200 for all labor, parts and materials.

Wednesday, November 2, 2016

Camp Muir


Thirty-five years ago I completed my most demanding hiking adventure when we reached Camp Muir at the 10,000ft level of Mt. Rainier in Washington State. It’s not a climb, but rather a steep, exhausting hike across a massive ice cream cone-like snow field, and it’s where most climbing parties spend the night before assaulting the summit.
This picture is borrowed from the Internet, as mine are all on slides.


As we rested, we ate lunch, took pictures and marveled at the view…looking down on drifting clouds and the awesome volcanic peaks of the Cascade Range. You could see almost to California.

To the rugged, experienced mountaineer, Camp Muir is nothing more than a freeway rest stop before the real climb to the summit, but to someone raised on the prairies, it’s pretty damned impressive! We had reached our objective after six hours of slipping and sliding in the sun-softening, icy snow, lugging 50lb packs. As we wheezed our way upward in the thinning air, stopping every few steps to recharge our lungs, thoughts of turning back nearly overcame the desire to accomplish our goal, but we persevered.     

Yesterday I experienced thoughts similar to those I had that day on the mountain. Due to slow progress, it’s been difficult to maintain interest in reawakening my Plymouth, and I often considered giving up. Too often I’d find myself sitting in the chair nursing a cup of coffee, and just looking at what had yet to be done, but after seeing the rear glass and windshield installed I know that it’s now mostly downhill. While there are still problems to resolve and hours of tedium to fight, most of the remaining work consists of bolting existing parts and pieces together.  I don’t know if I can retain my enthusiasm once the winter winds begin to blow, but for now, just as I did that day at Camp Muir, I’m going to enjoy the view and pat myself on the back for having reached a mini-summit of sorts.

Pictures of the glass installed to follow.

Friday, October 28, 2016

Preparing for Glass

After months of fabricating and modifying, I'm anxious to begin the bolt-on phase of my rebuild. The rear window seemed a good place to start, so I dragged out the new seal and began installing it on the window frame.


When they packaged the seal, they flipped it a couple of times to make it roll up, but after sitting in the box for several months, the rubber took on a set and didn't want to straighten out. It was like putting handcuffs on a python, but I finally got it in place and taped down. I'll leave it there for a day or two with hopes it will form itself into the proper shape. If not, I may have to roll the car outside to let the sun give it  some help. When I discovered how twisted this seal was, I hung the windshield seal out in the sun.


Spent a couple of hours polishing the stainless steel mouldings that go around the windshield and rear window. Only a couple of pieces to go, but I had to order s few threaded moulding fasteners as several are too rusted to reuse. I should have checked earlier.

I also began cleaning the glass and it's proving difficult. A sharp razor blade and scrubbing with soap and then lacquer thinner removed most of the old, baked-on and stained deposits, and cleaning grade vinegar took off a little more. However, there is a thin line around the outside edge where contact with the rubber seal began. It's almost as if the glass is etched, but might be nothing more than ancient mineral buildup. I'll try soaking in CLR, but if that doesn't work, I'll switch to the Dremel and some aggressive buffing compound.
            

Saturday, October 22, 2016

Door Sill Plates


Saw an address on a forum last week for a place that makes reproduction door sills. Mine are corroded and need to be replaced, but good used ones are impossible to find, so I called the place yesterday. The owner wasn’t there, but his friendly, chatty mother answered the phone and explained the business. It’s essentially a one man operation and the owner hand-makes everything. He’s been doing it for 36 years, so this is no fly-by-night business. There is no website as he doesn’t want to advertise his business by more than word-of-mouth.
Obviously, most of his work is for cars not supported by the aftermarket. He’s done lots of Mopars, including the Chrysler Museum, so that should speak to the quality.
Since everything is handmade, delivery times vary widely. She said orders can take from a few weeks to many months. After checking with him later, she said he has some ‘55/’56 Plymouth sills scheduled and that he should be working that batch in 2-3 months. My sills are priced at $275 a set, with a $50 deposit, and no credit cards accepted.
If interested, their contact info is:

Door Sills
81 Graham Ave North
Haledon, NJ 07508

Ph: 973-423-1196

Hip-Hop or This?

I know I previously posted this song done by the best, Andrea Bocelli and Celine Dion, but these kids do it pretty well also. About the time you think the future is impossibly bleak and hopeless, you find a gem that reminds you that there are still kids that work hard, have talent, and can perform music without anti-social gutter language.


Friday, October 21, 2016

Another Paint Day


A beautiful, calm, 70F degree day to work outside, so the insides of the doors and trunk, and the front splash panel are painted. I also touched up the thin spots on the body. If the paint hardens as fast as last time, I should be able to color sand and polish in about five days. Then I can install the doors and trunk lid or even install the rear glass when I get the urge.

I know it would be easier to install the glass and stainless trim before the trunk lid goes on, so that operation might come first. Since I have an extra rear glass, I want to practice the installation technique before I take on the new windshield.


Meanwhile, since the last two rains, the grass is growing faster and the honey-do list is getting longer, so it will likely be a slow week for car progress.

Tuesday, October 18, 2016

Mystery Moulding Parts List


Thanks to Ray for scanning the visor moulding parts list and emailing it to me. I haven't yet had much time to study it, but the usage seems a bit confusing, so I'll post the picture for others to see what they can make of it.

It appears that it was available on different models, and that it was used on both US and Canadian built cars. Maybe it will become more clear after I have some uninterrupted time to study.

I'm hoping the weather will cooperate and that I can spray on Friday. The ten day forecast is for light winds on that day only.

Sunday, October 16, 2016

Mystery Moulding


I sort of stumbled across a partial answer to one of the questions I raised in an earlier post about windshield trim moulding differences. While reading in the service manual how to install the glass, I discovered a note that describes a different procedure if your car is equipped with a “visor moulding”. There were no pictures, but it described how that style upper moulding was mounted with screws through the roof, requiring the headliner to be dropped in front to gain access to the nuts, and that’s the version I have.
The question remains about the purpose of a visor moulding, but at least there is a place to start.  Is it for appearance only, or is it somehow used in conjunction with a factory sun visor?...or is it because the shape is reminiscent of a small sun visor? It looks somewhat like the ’57 and later windshield moulding as it juts away from the glass, so it might be a trim option that influenced styling features in following years. If anyone has a '56 parts manual, I’m curious to know if it’s part of a trim package, or if it has a function. I'm guessing it's for looks only.


I hung the doors on my "new" paint rack in preparation for painting the inside surfaces when I haul out the spray gun to touch-up a couple of thin spots on the body.  At the same time I plan to paint the inside of the trunk and some smaller sheet metal parts. Once the insides are painted, I’ll mount the doors and trunk lid on the body and finish sanding, priming and painting them while they are in place. Though I’d like to spray both sides while they are on the rack, there is a strong chance I’d damage the paint trying to hang them by myself.

Wednesday, October 12, 2016

Windshield Arrived

The new windshield arrived yesterday, but it took two weeks to ship by freight from Oregon to Texas. It was well packed in a fitted cardboard structure, inside a heavy cardboard box that was strapped to a pallet and protected by a wood framework. I can now understand the shipping cost, but maybe the packaging was a bit overkill. They apparently use a standard-size shipping container for all their windshields, as the box could hold one twice the size of the '56.


I hope I can recruit a helper when its time to install glass. I doubt the local auto glass store would be interested in installing a windshield they don't sell, but maybe I can find a moonlighter willing to take on a side job.

Yesterday I remodeled my car dolly to create a wheeled rack on which I can hang bigger parts for painting. Unfortunately, I paid a price as I twisted my back again, so it looks like light duty for a while. I have enough small jobs to keep me busy, but I'm anxious to put more big parts together so it looks like real progress is being made.

Since it's back to light duty jobs again, instead of working on big sheet metal parts I changed oil and cleaned the carburetor on the rototiller. Though I drain the fuel every winter, the carb was gummed up with green sludge to the point the needle valve barely moved.  The cleaning cured the surge and dying problems, but the choke still has to be half-closed before the engine runs smoothly and has enough power to work under load. Seems like running lean is a common problem with small engines as they wear, but I haven't figured out why.

Saturday, October 8, 2016

E-Brake


I’m taking advantage of the opportunity to accomplish several things that are more accessible while the upper dashboard is removed, so priorities change again.

One job I’ve been postponing is replacing the original parking brake handle that operated the transmission mounted brake band to a foot operated emergency brake. The mounting bracket I made is made from 1/8” steel so it’s difficult to bend, but it’s finished and installed…and please forgive the hammer marks!


 The brake mechanism is from a ’79 Aspen parts car, and the different shapes of the kick panels and location of foot operated controls somewhat limit how the pedal can be mounted in the ‘56. It’s higher and sits a t a slightly different angle than I like, but I had to leave room for my foot to reach the dimmer switch without hitting the brake. If I modify the pedal arm, I can improve on the location, but that will wait until the seats and dash are installed so I can get a better feel for the best location.


The upper part of the firewall was also more accessible to install more soundproofing material, so I took care of that. I like quiet cars, so I’m not going to skimp on anything that helps cut road and engine noise.

Tuesday, October 4, 2016

The Land of Lost Toys...Automotive Version

After installing the new gaskets for the wiper shaft bezels, I learned that just as there is a land of lost toys, there surely must be a land of lost car parts, as so often I find myself spending more time looking for a part I misplaced than I would installing it.

When I removed the dash top to install the defroster vent that I should have installed first, I had better access to the wiper shafts, so it was the perfect time to attach them to the motor. When I went to retrieve the little plastic box of assorted e-clips, it was nowhere to be found. I must have spent an hour looking for that damn box, and finally gave up in disgust. I know that it will show up within days of not needing it, but for now I have to make another trip into town to buy more clips.

Other than that, it's been a week of yard work and I've done little more than repair and polish some stainless trim, patch holes and dents in the trunk lid, and clean up around the shop.

Yard work isn't going much better. The rototiller needs the carburetor cleaned again to keep it from stalling out at full throttle. That's become an annual event. Ditto for the year-old leaf blower. It will only run with the choke half-closed, so it's on the repair list this winter. Don't you just love modern Ethanol laced fuels that constantly gum up the fuel system? The problem might not be severe in cooler climates, but our hot Texas summers cause all sorts of fuel related problems.

Between the idiotic no-spill gas cans that spill and leak more than the old designs, and the need to frequently disassemble fuel systems and solvent clean, I'm releasing far more hydrocarbon vapors into the air than I did thirty years ago...before bureaucrats became smarter than engineers.

Thursday, September 29, 2016

Color Sanding Complete!

With the perfect weather, I've been able to do some yard work and sneak in a couple of hours on the car. I finished color sanding and gave it a quick polish. While sanding, I found three small thin spots that I'll have to repaint, but it looks quite nice in most places. There is some orange peel, but then many new cars also have some, so I can live with what I have.

Now I can concentrate on getting everything ready for the windshield install. The neoprene arrived, so I cut out gaskets for the windshield wiper bezels. I neglected to install the defroster vents before I bolted down the upper dash, so it will have to come out again, and that's okay since then I'll have easier access to hook up the wiper linkage. Then I can install the windshield.

I also did some work on the trunk lid. As you can see, it looks like someone tried to open the trunk with a pry bar. There were dents all along the lower edge that had to be popped out and filled. I'll paint the underside at the same time I touch up the thin spots. The outside will wait until I've finished repairing the fenders and hood so can paint them all at the same time.


After the dent repairs, I treated the inside with rust reformer and etch-primed the outside, so now it can go back into storage for a few days.

Monday, September 26, 2016

Sanding Progress

I'm about seventy five percent done with color sanding, but I've been neglecting household chores lately and need to spend a few days catching up. The weather is finally cooling off, so yard work will be a priority while the temps hold. If the digging, weeding and mulching doesn't wear me out too much, I might be able to sneak away for a few minutes in the evenings to do some sanding. With color on the body, it's somewhat easier to generate enthusiasm for the mundane tasks, even when exhausted.

I ordered two thicknesses of neoprene material over the weekend. I have several gaskets that will have to be hand made since they are no longer available. I know...I know...what did I expect?


Saturday, September 24, 2016

Going for the Gold!


When your tired old arms are aching from color sanding, what's the logical thing to do? Well, I’ve been impatient to see what the gold material looked like against the paint, so I put down the sanding pad and brought out the gold. I didn't trim it to size and shape yet, but you can get the idea.

Since there is no matching-pattern aluminum for the side trim available anywhere, instead of settling for painting the gold spear I elected to buy some of the Mylar material  James Rawa used for his ’57-’58 Plymouth spears. The material size was such that the spear will be slightly smaller than stock, but that was my intent anyway, so everything worked out fine. He had never done one for a ’56, but I measured what I needed, and he laid it out.  He was great to deal with and despite the different pattern, I’m very pleased with the look.


The photo does not show the ’57 color accurately, but in person I much prefer the deviation from the stock white, and in the company of a real ‘56 there will be no mistaking it for a butchered stock Fury. Not everyone will like my modifications, but the other option was to use the Belvedere for a parts car, so I will definitely have one of a kind, but it won't be a clone.

Tuesday, September 20, 2016

Windshield Trim Difference

I've been looking at and enjoying the beautiful Exner lines for fifty years, but I must be blind to detail, because I just discovered that there is a rather distinct styling difference between '56 Plymouths of the same year.

I ordered a windshield ($$$!) yesterday and decided to polish the trim so it will be ready to install. To my surprise the upper and side mouldings are much different between my Belvedere and the Fury parts car! FWIW, I much prefer the wide version, and since there are holes in the roof for the fasteners, it's the one I'm going to install.


After finding this, I searched for more photos on the Internet and found nothing to indicate that either style is consistent on 2-door hardtops. The wider style appears to be the only one used on convertibles, but hardtops can have either, no matter if they were Belvederes, Savoys or Furys.

I'd be curious to know if it was date or factory restricted.

Meanwhile, color sanding continues.

Sunday, September 18, 2016

Color Sanding

Yesterday I started color sanding, but before I did, I asked for professional opinions on a popular auto body repair forum. Just as there are varying ideas about everything else in the world, no two people can agree on the best method to finish a paint job.

I've never had the desire for an immaculate paint finish on any of my cars. I want to drive them without fear of acquiring a blemish on perfection. I want to enjoy them and to let others do the same. I never post a "Look but don't Touch" sign on my cars at a car show. It's fun letting kids sit behind the wheel  of a car they'll likely never have the joy of driving, or letting an old couple sit together and reminisce about the car..."just like it"...that he owned when they were dating. Pleasure shared with others is much more rewarding than when it is not.

That said, I followed one expert's suggestions for sanding grit, method, and how and with what to polish. The easier process he recommended would never pass for a concourse restoration, but is certainly acceptable for my daily driver expectations. The problem is that any method is very tiring for an old body, and may take longer than expected.  I may have to add a few recovery days between work days. Today I'm going to recover by spending a few hours riding around on the lawn mower. It uses fewer muscles!


Sunday, September 11, 2016

Surprise!

I checked the Weather  Channel last night and the updated forecast was for a perfect day to paint outside. It was a chilly morning, but calm, and the prediction was that it would remain much the same all day. By 9 am, I had everything ready to go, and by 10, the first coat was applied, and looked really nice. With only a light, intermittent breeze blowing, I went ahead and sprayed a second coat. The sun was higher and the temperature getting hot, so the second coat had some minor orange-peel and dry overspray, but overall I'm satisfied with the results. Best part was that the new sprayer worked perfectly and that I was able to apply two coats without a single run!


When I selected the paint, I chose a single stage polyurethane for three reasons. First, it looks period correct, unlike the extra high gloss B-C paints today. Another reason is that because I had to paint outside I expected minor issues that would require color sanding to fix, and this product allows for that. A final reason is that it's about half the price of the more popular paint products. Since the car will be babied and garaged, any lesser resistance to weathering shouldn't be a problem during my lifetime.

Besides the two minor problems already mentioned, a few gnats decided to commit suicide by leaping into wet paint, but no biggie to sand them out and touch-up if necessary. The tiny bugs are not nearly as troublesome as the huge yellow butterfly that landed on the freshly painted hood of my truck several years ago! That took a lot of work to repair.

Now I must wait a minimum of 72 hours for the paint to cure, but that's okay considering I didn't expect to be painting for at least ten days.

I'm really glad I chose to buy the DeVilbiss SRI pro-quality paint gun, as I'm certain I saved myself many hours of rework and repair. The only criticism is that it's small and considered a touch-up gun, so it took a little longer to paint the entire car, but it does such a good job, that I shouldn't even mention it. Unless you plan a steady diet of big projects, it's the perfect size for the hobbyist. Another great point is that it's made in Great Britain, where quality is still important!

Saturday, September 10, 2016

Lost in the Sixties

Still on hold for painting and the forecast doesn't look encouraging for at least ten days.

Today is the biggest local show of the year in nearby Denton, and it's pouring rain that is expected to last most of the day. I had intended to pre-register my '64 Valiant to save a few bucks, but they sent the forms too late, so I guess I saved even more by not registering at all.

I've owned this V200 for about sixteen years and have gradually restored, upgraded or modified nearly every part. It has a lightly modified '79 Super Six, and all the drivetrain, brakes and suspension have been upgraded. It's fun to drive, but doesn't get much use in the mid-summer heat.


As you can see, I like sixties Mopars also. I worked at a Chrysler-Plymouth dealership in '64 and had a couple of Valiant demos, and loved them. I had been looking for a Valiant convertible for years when I found this one.

 The music began to deteriorate about the time the war began, but it was still a good time to be alive.